
SoftLayerでiSCSIを使ってみる #softlayer
この記事は1年以上前に投稿されました。情報が古い可能性がありますので、ご注意ください。
今回の記事では、Linux仮想サーバでiSCSIマウントをやってみます。
iSCSIとは
iSCSI(Internet Small Computer System Interface)は、SCSIプロトコルをTCP/IPネットワーク上で使用する規格です。iSCSIプロトコルは、データ転送のためにTCP/IPを使います。iSCSIを使うと、社内LANなどのTCP/IPネットワーク上に大容量ハードディスクなどの記憶装置に接続して、複数のコンピュータから共用できるようになります。ネットワーク機器もとても簡単で、イーサネットインタフェースであればいいです。これによって、低価格でストレージの集中化を可能とするメリットがあります。
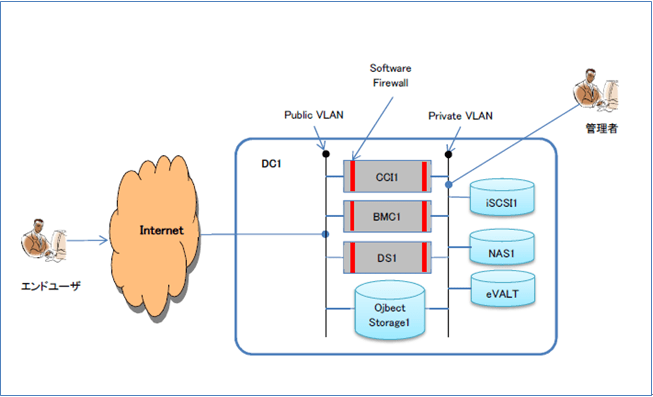
iSCSIのネットワーク構成
SosfLayerでiSCSIは、Private VLAN経由で仮想サーバにマウントされます。
iSCSI作成
メインメニューの[Storage→NAS→Order iSCSI]を選択して下さい。
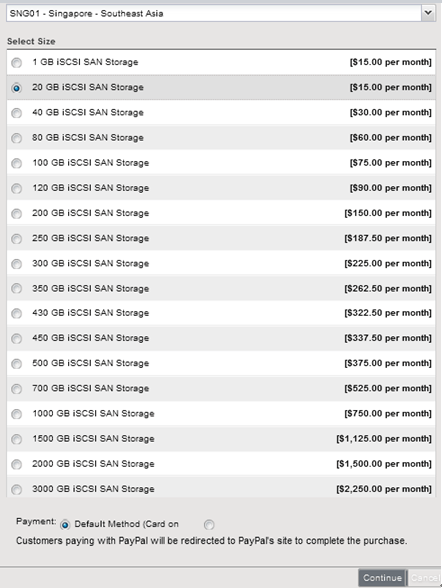
| Location | Singapore | ホームデータセンターを選択する |
| Select Size | 20GB | ボリュームサイズを選択する |
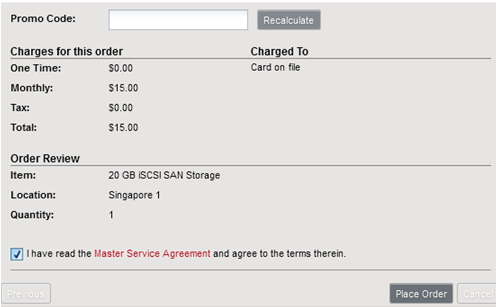
マスタサービスアグリメントに同意し、オーダを確定して下さい。
メインメニューの[Storage→iSCSI→Order iSCSI]を見て下さい。
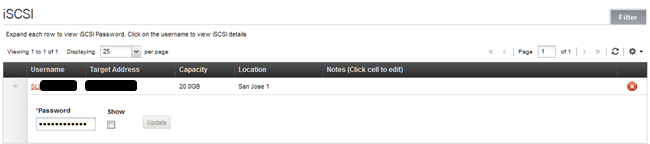
| UserName | SL123456-1 | アカウントID+一連番号 |
| Hostname | 123.123.123.123 | iSCSIのターゲットホスト名。 SoftLayerのインターナルネットワーク。 |
| Password | ******** | プロビジョニングされている |
パスワードの表示は、iSCSI一覧をクリックして下さい。
事前準備
Linux (CentOS 6/64bit)が必要です。今回の記事では、シンガポールリージョンを前提にしています。
IinuxのiSCSIマウント
[参考資料]
Connect to an iSCSI LUN in Linux with Open-iSCSI
OSSでLinuxサーバ構築
UnixPower on Networking
Linux仮想サーバにログインして下さい。OSをアップデートして下さい。
# yum update –y

# cat /etc/redhat-release

CentOS release 6.5 (Final)
iSCSIのイニシェータをインストールして下さい。
# yum install iscsi-initiator-utils -y
iscsid.confファイルのバックアップを作成して下さい。
# cp /etc/iscsi/iscsid.conf{,.save}
そして/etc/iscsi/iscsid.confの内容を編集して下さい。
node.startup = automatic
node.session.auth.username = SLI23456-1
node.session.auth.password = XXXXXXXXXXXXXX
discovery.sendtargets.auth.username = SLI23456-1
discovery.sendtargets.auth.password = XXXXXXXXXXXXXX
node.session.timeo.replacement_timeout = 120
node.conn[0].timeo.login_timeout = 15
node.conn[0].timeo.logout_timeout = 15
node.conn[0].timeo.noop_out_interval = 10
node.conn[0].timeo.noop_out_timeout = 15
node.session.iscsi.InitialR2T = No
node.session.iscsi.ImmediateData = Yes
node.session.iscsi.FirstBurstLength = 262144
node.session.iscsi.MaxBurstLength = 16776192
node.conn[0].iscsi.MaxRecvDataSegmentLength = 65536
iSCSIサービスを起動して下さい。
# /etc/init.d/iscsi start
クライアントのイニシエータとiSCSIターゲットホストの接続を行います。
# iscsiadm -m discovery -t sendtargets -p 123.123.123.123
[123.123.123.123:3260,1 iqn.2001-05.com.equallogic:0-xxxxxxxxxxxxxxxxxxxxxxxxxxxxxxxxx-sli294078-2
iSCSIサービスを再起動して下さい。
# /etc/init.d/iscsi restart
Stopping iscsi: [ OK ]
Starting iscsi: [ OK ]
デバイス情報を確認して下さい。
# find /sys/devices/platform/host* -name block\* -exec ls -la '{}' \; | sed s#^.*../block/#/dev/#g
total 0
drwxr-xr-x 3 root root 0 May 21 01:18 .
drwxr-xr-x 8 root root 0 May 21 01:18 ..
drwxr-xr-x 7 root root 0 May 21 01:18 sda

# fdisk -l
...中略
Disk /dev/sda: 21.5 GB, 21485322240 bytes
64 heads, 32 sectors/track, 20490 cylinders
Units = cylinders of 2048 * 512 = 1048576 bytes
Sector size (logical/physical): 512 bytes / 512 bytes
I/O size (minimum/optimal): 512 bytes / 512 bytes
Disk identifier: 0x00000000
/dev/sdbがiSCSI経由でローカルディスクとして認識されています。partedやfdiskでパーティションを作成し、フォーマットしてからマウントして下さい。
# fdisk /dev/sda

Device contains neither a valid DOS partition table, nor Sun, SGI or OSF disklabel
Building a new DOS disklabel with disk identifier 0xadc78478.
Changes will remain in memory only, until you decide to write them.
After that, of course, the previous content won't be recoverable.
Warning: invalid flag 0x0000 of partition table 4 will be corrected by w(rite)
WARNING: DOS-compatible mode is deprecated. It's strongly recommended to
switch off the mode (command 'c') and change display units to
sectors (command 'u').
警告が出ますが、正常の範囲です。そのまま進めて下さい。
Command (m for help):n

Command action
e extended
p primary partition (1-4)
p

Partition number (1-4): 1
First cylinder (1-20490, default 1):
Using default value 1
Last cylinder, +cylinders or +size{K,M,G} (1-20490, default 20490):
Using default value 20490

Command (m for help): p
Disk /dev/sda: 21.5 GB, 21485322240 bytes
64 heads, 32 sectors/track, 20490 cylinders
Units = cylinders of 2048 * 512 = 1048576 bytes

Sector size (logical/physical): 512 bytes / 512 bytes
I/O size (minimum/optimal): 512 bytes / 512 bytes
Disk identifier: 0x2afb60f3

Device Boot Start End Blocks Id System
/dev/sda1 1 20490 20981744 83 Linux

ommand (m for help): w

The partition table has been altered!
Calling ioctl() to re-read partition table.
Syncing disks.
パーティションを確認して下さい。
# fdisk –l
…中略
Disk /dev/sda: 21.5 GB, 21485322240 bytes
64 heads, 32 sectors/track, 20490 cylinders
Units = cylinders of 2048 * 512 = 1048576 bytes
Sector size (logical/physical): 512 bytes / 512 bytes
I/O size (minimum/optimal): 512 bytes / 512 bytes

Disk identifier: 0x2afb60f3
Device Boot Start End Blocks Id System
/dev/sda1 1 20490 20981744 83 Linux
パーティションをフォーマットして下さい。
# mkfs.ext4 /dev/sda1
マウントポイントを作成して下さい。
# mkdir /mnt/iscsi
/dev/sda1をマウントして下さい。
# mount -t ext4 /dev/sda1 /mnt/iscsi
マウント結果を確認して下さい。
# df -h
Filesystem Size Used Avail Use% Mounted on
/dev/xvda2 25G 1.3G 22G 6% /
tmpfs 497M 0 497M 0% /dev/shm
/dev/xvda1 248M 79M 157M 34% /boot
/dev/sda1        20G  172M   19G   1% /mnt/iscsi
正常にファイル作成や削除が可能かを検証してみて下さい。
# touch /mnt/iscsi/testfile
# ls -l /mnt/iscsi/
total 16
drwx------ 2 root root 16384 May 21 01:53 lost+found
-rw-r--r-- 1 root root 0 May 21 01:57 testfile

# rm /mnt/iscsi/testfile
rm: remove regular empty file `/mnt/iscsi/testfile'? y
# ls /mnt/iscsi/
lost+found
ブート時にiSCSIのマウントするためには、まずサービスを自動起動にして下さい。
# chkconfig iscsi on
# chkconfig --list iscsi
iscsi 0:off 1:off 2:on 3:on 4:on 5:on 6:off
そして/etc/fstabに追加して下さい。
# vi /etc/fstab
/dev/sda1 /mnt/iscsi ext4 _netdev 0 0
まとめ
SoftLayerは、このように簡単にiSCSIを大容量のストレージとしてマウントして使うことができます。
Author
モダンアーキテクチャー基盤のソリューションアーキテクトとして活動しています。
[著書]
・Amazon Cloudテクニカルガイド―EC2/S3からVPCまで徹底解析
・Amazon Elastic MapReduceテクニカルガイド ―クラウド型Hadoopで実現する大規模分散処理
・Cypherクエリー言語の事例で学ぶグラフデータベースNeo4j
・Neo4jを使うグラフ型データベース入門(共著)
・RDB技術者のためのNoSQLガイド(共著)


