Mesosphere チュートリアル01:Mesosphere 3node-cluster検証(CentOS6.5) #mesos #mesosphere

この記事は1年以上前に投稿されました。情報が古い可能性がありますので、ご注意ください。
はじめに
Mesosphereは、Apache Mesos( http://mesos.apache.org/ )を基盤とし、自己修復やフォールト・トレラントのほか、スケール出来る環境を実現するための全ての機能が含まれているシステムです。Mesosphereは、Apache Mesosのほか、Dockerコンテナをデプロイ・管理するMarathonと、ジョブ・スケジューラを管理するChronosといったツールで構成されます。
本稿は、下記のドキュメントを参考にし、Apache MesosとZookeeperのインストールを行います。合計4台のサーバ上にMesosのMasterとSlaveのノードを設定後、MesosのWebUIを有効にするまでの手順を紹介します。
参照: “Setting up a Mesosphere Cluster”
事前準備
使用するホストはDNSで正引き、逆引きができるようにしておくこと。
1.Masterノードの設定
1-1.仮想マシンの準備(物理マシンでもよい)
- vCPU:1
- MEM: 1024MB
- vHDD: 40GB
CentOS6.5 Minimal x86_64をインストールし、SELinuxを無効にします。
yum -y update
service iptabels stop
service ip6tables stop
chkconfig iptables off
chkconfig ip6tables off
1- 2.インストール
mesosのパッケージをダウンロードして、mesos本体 と marathon をインストールします。
sudo rpm -Uvh http://repos.mesosphere.io/el/6/noarch/RPMS/mesosphere-el-repo-6-2.noarch.rpm
sudo yum -y install mesos marathon
Zookeeperのパッケージをインストールします。
sudo rpm -Uvh http://archive.cloudera.com/cdh4/one-click-install/redhat/6/x86_64/cloudera-cdh-4-0.x86_64.rpm
sudo yum -y install zookeeper
Zookeeperの設定をします。
設定例
zookeeper-server-initialize --myid=1
※ myidはホスト毎に異なる値にしてください。
この段階で3台のmasterのネットワーク設定は以下のようになっています。
| ホスト名 | IPアドレス | Zookeeper Myid | |
|---|---|---|---|
| 1台め | mesos-m1 | 192.168.2.80 | 1 |
| 2台め | mesos-m2 | 192.168.2.98 | 2 |
| 3台め | mesos-m3 | 192.168.2.95 | 3 |
1- 3.設定
/etc/zookeeper/conf/zoo.cfgを編集
(末尾に追加)
server.1=192.168.2.80:2888:3888
server.2=192.168.2.98:2888:3888
server.3=192.168.2.95:2888:3888
/etc/mesos/zkを編集
zk://192.168.2.80:2181,192.168.2.98:2181,192.168.2.95:2181/mesos
/etc/mesos-master/quorumを編集
2
Mesos-Slaveを無効にします。
/etc/init/mesos-slave.confを編集
cat /etc/init/mesos-slave.conf
description "mesos slave"
# Start just after the System-V jobs (rc) to ensure networking and zookeeper
# are started. This is as simple as possible to ensure compatibility with
# Ubuntu, Debian, CentOS, and RHEL distros. See:
# http://upstart.ubuntu.com/cookbook/#standard-idioms
#(コメントアウトし起動しないようにする)
#start on stopped rc RUNLEVEL=[2345]
#respawn
#
#exec /usr/bin/mesos-init-wrapper slave
この状態でZookeeperを起動すると、Mesosは自動的にZookeeperクラスタの構成に参加するようになります。
/usr/bin/zookeeper-server start
再起動時に自動的にZookeeperが起動するようにするには、/etc/rc.localを編集します。
#!/bin/sh
#
# This script will be executed *after* all the other init scripts.
# You can put your own initialization stuff in here if you don't
# want to do the full Sys V style init stuff.touch /var/lock/subsys/local
/usr/bin/zookeeper-server start (<-追加)
1 - 4.動作確認
この状態でクラスタ内のホスト(どれでもよい)のWebインターフェイスを開く
http://<クラスタのIPアドレス>:5050/
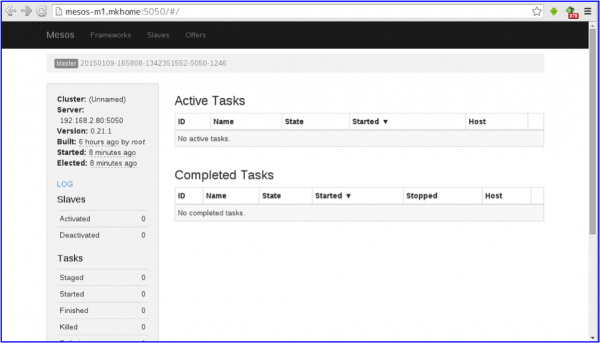
以下のような画面が表示されます。

クラスタのマスターノードではないホストの画面を開いたときには、その旨が表示され、自動的にマスターノードの画面にリダイレクトされる(<-逆に言うと、リダイレクトされない場合はクラスタ構成で動作していないことを疑った方がいい)

どのノードが現在のリーダーかを知るにはログファイルを見ることで判断することもできます。
※以下の例では最終的にリーダーは192.168.2.80(ホスト名”mesos-m1”)になっています。
# grep -E "master.cpp" /var/log/mesos/mesos-master.INFO

I0109 16:58:08.276381  1246 master.cpp:318] Master 20150109-165808-1342351552-5050-1246 (mesos-m1.mkhome) started on 192.168.2.80:5050

I0109 16:58:08.276464  1246 master.cpp:366] Master allowing unauthenticated frameworks to register

I0109 16:58:08.276481  1246 master.cpp:371] Master allowing unauthenticated slaves to register

I0109 16:58:08.286000  1246 master.cpp:1202] Successfully attached file '/var/log/mesos/mesos-master.INFO'

I0109 16:58:08.388535  1279 master.cpp:1263] The newly elected leader is master@192.168.2.95:5050 with id 20150109-165053-1594009792-5050-1136

I0109 16:58:19.843878  1275 master.cpp:1263] The newly elected leader is master@192.168.2.80:5050 with id 20150109-165808-1342351552-5050-1246

I0109 16:58:19.843955  1275 master.cpp:1276] Elected as the leading master!

I0109 16:58:19.844018  1275 master.cpp:1094] Recovering from registrar

I0109 16:58:19.968009  1277 master.cpp:1121] Recovered 0 slaves from the Registry (96B) ; allowing 10mins for slaves to re-register

I0109 16:58:20.949239  1274 master.cpp:1520] Received re-registration request from framework 20150109-155235-1594009792-5050-1664-0000 (marathon-0.7.6) at scheduler-7eea8dd9-7c38-4a22-b717-4bd9cd1cd59c@192.168.2.80:40054

I0109 16:58:20.949724  1274 master.cpp:1573] Re-registering framework 20150109-155235-1594009792-5050-1664-0000 (marathon-0.7.6)  at scheduler-7eea8dd9-7c38-4a22-b717-4bd9cd1cd59c@192.168.2.80:40054

I0109 17:03:12.918834  1277 master.cpp:3556] Performing implicit task state reconciliation for framework 20150109-155235-1594009792-5050-1664-0000 (marathon-0.7.6) at scheduler-7eea8dd9-7c38-4a22-b717-4bd9cd1cd59c@192.168.2.80:40054

I0109 17:08:12.915963  1276 master.cpp:3556] Performing implicit task state reconciliation for framework 20150109-155235-1594009792-5050-1664-0000 (marathon-0.7.6) at scheduler-7eea8dd9-7c38-4a22-b717-4bd9cd1cd59c@192.168.2.80:40054
2.Slaveノードの設定
2ー1.仮想マシンの準備(物理マシンでもよい)
- vCPU:1
- MEM: 1024MB
- vHDD: 40GB
CentOS6.5 Minimal x86_64をインストールし、SELinuxを無効にします。
yum -y update
service iptabels stop
service ip6tables stop
chkconfig iptables off
chkconfig ip6tables off
2 - 2.インストール
mesosのパッケージをダウンロードして、mesos をインストールします。
sudo rpm -Uvh http://repos.mesosphere.io/el/6/noarch/RPMS/mesosphere-el-repo-6-2.noarch.rpm
sudo yum -y install mesos
2 - 3.設定
/etc/mesos/zkを編集
zk://192.168.2.80:2181,192.168.2.98:2181,192.168.2.95:2181/mesos
Mesos Masterが起動しないようにする
/etc/init/mesos-master.confを編集
cat /etc/init/mesos-master.conf
description "mesos master"
# Start just after the System-V jobs (rc) to ensure networking and zookeeper
# are started. This is as simple as possible to ensure compatibility with
# Ubuntu, Debian, CentOS, and RHEL distros. See:
# http://upstart.ubuntu.com/cookbook/#standard-idioms
#(コメントアウトし起動しないようにする)
#start on stopped rc RUNLEVEL=[2345]
#respawn
#
#exec /usr/bin/mesos-init-wrapper master
再起動
2ー4.動作確認
Slaveの再起動後、Masterクラスタ内のホスト(どれでもよい)のWebインターフェイスを開く
http://<MasterのIPアドレス>:5050/
以下のような画面が表示される。[Slaves]-[Activated]の項目が変化していることを確認する。

3.そのほか
Mesos Master WebUIリダイレクト時にホストの名前解決ができずページが開けない。リダイレクト先をIPアドレスにできないか
2015/1/16 時点、名前解決が出来ない。現状のMesosの仕様ではホストはDNSで名前解決できることが動作の暗黙の前提になっているため、DNSなしの運用はできない。
MesosのページにはDNSなしの運用方法についてドキュメントがある( http://mesos.apache.org/documentation/latest/configuration/ )が、この通りに設定しても正常に動作しないことが確認できている。
WebUIを使う場合にはWebブラウザを動作させるクライアントからも名前解決が出きるように設定しておくこと(/etc/hostsなどを編集する)


