
GitLab CIとGoogle Artifact RegistryをWorkload Identity連携しよう #gitlab #googlecloud #oidc #docker #kaniko #terraform #opentofu
この記事は1年以上前に投稿されました。情報が古い可能性がありますので、ご注意ください。
はじめに
DockerイメージをGitLabのCIでビルドし、Google Artifact Registryにプッシュする状況を考えてみましょう。ここで問題になってくるのは「GitLab CIからArtifact Registryに自動ログインするには、どうしたらいいのか?」ということです。
素朴に考えるとGoogle Cloud側でサービスアカウントキーを作成し、GitLab側に保存して使用すると思います。しかし、サービスアカウントキーという強力な認証情報をGoogle Cloud外に持ち出して保存することには、漏洩の心配がつきまといます。鍵をローテーションするにしても、漏洩の被害をある程度軽減するものではあっても漏洩そのものを防ぐわけではありません。
そこでGitLabとGoogle CloudをWorkload Identity 連携し、サービスアカウントキーの代わりに有効期間の短い認証情報を用いることにしてみましょう。本稿では OpenTofu (乃至 Terraform) で設定します。
前提条件
今回はセルフホスト型 GitLab とします。後述しますが .gitlab-ci.yml と CI/CD変数 しか使っていないため、マネージド GitLab でも動くと思います。
- URL :
gitlab.example.com/group-name/project-1 - プロジェクトID:
12345
がレポジトリのURLとします。
Google Cloud側もArtifact Registryなど最低限の設定はできているものとします。ここでは、
- プロジェクト名:
example-name - プロジェクトID:
example-id - プロジェクト番号:
112233445566 - リージョン:
us-central1(アイオワ)
とします。
Workload Identity連携の設定
OpenTofu (乃至 Terraform) で設定します。無関係な部分に関しては省略します。
Workload Identityプール
Google Cloudの外部にあたる GitLab のIDを管理するためのWorkload Identityプールを作成します。
resource "google_iam_workload_identity_pool" "this" {
  workload_identity_pool_id = "pool"
}
google_iam_workload_identity_pool もご覧ください。
Workload Identityプールプロバイダ
Google Cloud と Workload Identity プールの関係を記述するWorkload Identityプールプロバイダを作成します。
resource "google_iam_workload_identity_pool_provider" "this" {
  workload_identity_pool_id = google_iam_workload_identity_pool.this.workload_identity_pool_id
  workload_identity_pool_provider_id = "pool-provider"

  oidc {
    allowed_audiences = ["https://gitlab.example.com"]
    issuer_uri = "https://gitlab.example.com/"
  }

  attribute_mapping = {
    "google.subject"           = "assertion.sub",
    "attribute.aud"            = "assertion.aud",
    "attribute.project_path"   = "assertion.project_path",
    "attribute.project_id"     = "assertion.project_id",
    "attribute.namespace_id"   = "assertion.namespace_id",
    "attribute.namespace_path" = "assertion.namespace_path",
    "attribute.user_email"     = "assertion.user_email",
    "attribute.ref"            = "assertion.ref",
    "attribute.ref_type"       = "assertion.ref_type",
  }
}
oidcブロックで OpenID Connectの設定を行っています。 issuer_uri でトークン発行者のURLを指定し、 allowed_audiences でトークンの aud フィールドで許可する値を指定しています。
oidc {
  allowed_audiences = ["https://gitlab.example.com"]
  issuer_uri = "https://gitlab.example.com/"
}
ここでは発行者はセルフホスト GitLab (スラッシュで終わること)で、aud (audience, トークンの発行を受けるクライアント) もやはりセルフホスト GitLab (今度はスラッシュを取り除くこと)です。
attribute_mapping で外部のIDプロバイダから発行された認証情報の属性を、Google Cloudの属性にマッピングします。
attribute_mapping = {
  "google.subject" = "assertion.sub",
  "attribute.aud" = "assertion.aud",
  "attribute.project_path" = "assertion.project_path",
  "attribute.project_id" = "assertion.project_id",
  "attribute.namespace_id" = "assertion.namespace_id",
  "attribute.namespace_path" = "assertion.namespace_path",
  "attribute.user_email" = "assertion.user_email",
  "attribute.ref" = "assertion.ref",
  "attribute.ref_type" = "assertion.ref_type",
}
ここではまず GitLab が発行した assertion.sub を Google Cloud の google.subject にマッピングしています。それ以外が難しく… Create a Workload Identity Provider を見ても attribute.X = assertion.X (You must map every attribute that you want to use for permission granting.) としか書いてなくてズバリ何を指定したらいいのかわかりません…。
さらに読み進めると OpenID Connect (OIDC) Authentication Using ID Tokens に X が載っています。さらに具体的なマッピングは Configure OpenID Connect In Google Cloud や Google Cloud Workload Identity Federation and IAM policies にもあります。どちらも違うようですが…。先の文を読むと、許可する条件に使いたい属性を書くようです。ひとまずレポジトリのほうを拝借させてもらうことにしました。
google_iam_workload_identity_pool_provider もご覧ください。
サービスアカウント
Artifact Registry に Docker イメージをプッシュする権限 roles/artifactregistry.writer を持ったサービスアカウントを作成します。
resource "google_service_account" "gitlab" {
  project    = google_artifact_registry_repository.this.project
  account_id = "${var.project_name}-sa-gitlab"
}

resource "google_artifact_registry_repository_iam_member" "gitlab" {
  project    = google_artifact_registry_repository.this.project
  location   = google_artifact_registry_repository.this.location
  repository = google_artifact_registry_repository.this.name
  role       = "roles/artifactregistry.writer"
  member     = "serviceAccount:${google_service_account.gitlab.email}"
}
これで作成されたサービスアカウントのメールアドレスはここでは example-name-sa-gitlab@example-id.iam.gserviceaccount.com となります。
google_service_account と google_artifact_registry_repository_iam_member もご覧ください。
サービスアカウントの権限借用
roles/iam.workloadIdentityUser ロールを持つプリンシパルは、指定したサービスアカウント(後述)の権限を借用できます。
resource "google_project_iam_member" "workload_identity_user" {
  project = google_artifact_registry_repository.this.project
  role = "roles/iam.workloadIdentityUser"
  member = "principalSet://iam.googleapis.com/projects/${data.google_project.project.number}/locations/global/workloadIdentityPools/${google_iam_workload_identity_pool.this.workload_identity_pool_id}/attribute.project_id/${var.gitlab_project_id}"
}
ここではGitLabのプロジェクトIDの 12345 を OpenTofu (Terraform) のローカル変数 var.gitlab_project_id で参照できるようにしてあり、これに一致するもののみに制限しています。
プリンシパルタイプもご覧ください。
GitLab の設定
次は GitLab 側の設定を行っていきます。
CI/CD 変数設定
Google Cloudにてリソースを作成済みで、それらから値を得てください。
ARTIFACT_REGISTRY:us-central1-docker.pkg.dev- Artifact Registry の Docker コンテナレジストリホストです。設定されたものを使ってください。
GCP_PROJECT_NAME:example-name- Google Cloudのプロジェクト名です。
GCP_PROJECT_ID:example-id- Google CloudのプロジェクトIDです。
GCP_PROJECT_NUMBER:112233445566- Google Cloudのプロジェクト番号です。
GCP_SERVICEACCOUNT_EMAIL:example-name-sa-gitlab@example-id.iam.gserviceaccount.com- Google Cloudに作成したサービスアカウントです。GitLab からはこのサービスアカウントを借用することになります。
GCP_WORKLOAD_POOL_ID:pool- Google CloudのWorkload IdentityプールIDです。
GCP_WORKLOAD_PROVIDER_ID:pool-provider- Google CloudのWorkload IdentityプールプロバイダIDです。
.gitlab-ci.yml
次の設定とします。
stages:
  - build

build:
  stage: build
  image:
    name: gcr.io/kaniko-project/executor:v1.23.2-debug
    entrypoint: [""]
  id_tokens:
    GCP_ID_TOKEN:
      aud: https://gitlab.example.com
  script:
    - |
      PAYLOAD="$(cat <<EOF
      {
        "audience": "//iam.googleapis.com/projects/$GCP_PROJECT_NUMBER/locations/global/workloadIdentityPools/$GCP_WORKLOAD_POOL_ID/providers/$GCP_WORKLOAD_PROVIDER_ID",
        "grantType": "urn:ietf:params:oauth:grant-type:token-exchange",
        "requestedTokenType": "urn:ietf:params:oauth:token-type:access_token",
        "scope": "https://www.googleapis.com/auth/cloud-platform",
        "subjectTokenType": "urn:ietf:params:oauth:token-type:jwt",
        "subjectToken": "${GCP_ID_TOKEN}"
      }
      EOF
      )"
    - |
      FEDERATED_TOKEN=$(wget -qO- \
        --header="Content-Type: application/json" \
        --post-data="$PAYLOAD" \
        "https://sts.googleapis.com/v1/token" \
        | grep -o '"access_token": *"[^"]*"' \
        | sed 's/"access_token": *"\([^"]*\)"/\1/')
    - |
      ACCESS_TOKEN=$(wget -qO- \
        --header="Content-Type: application/json" \
        --header="Authorization: Bearer $FEDERATED_TOKEN" \
        --post-data='{"scope": ["https://www.googleapis.com/auth/cloud-platform"]}' \
        "https://iamcredentials.googleapis.com/v1/projects/-/serviceAccounts/${GCP_SERVICEACCOUNT_EMAIL}:generateAccessToken" \
        | grep -o '"accessToken": *"[^"]*"' \
        | sed 's/"accessToken": *"\([^"]*\)"/\1/')
    - mkdir -p /kaniko/.docker
    - |
      echo "{\"auths\":{\"us-central1-docker.pkg.dev\":{\"auth\":\"$(printf "oauth2accesstoken:%s" "$ACCESS_TOKEN" | base64 | tr -d '\n')\"}}}" \
      > /kaniko/.docker/config.json
    - |
      /kaniko/executor \
      --context "${CI_PROJECT_DIR}" \
      --dockerfile "${CI_PROJECT_DIR}/Dockerfile" \
      --destination "us-central1-docker.pkg.dev/${GCP_PROJECT_ID}/${GCP_PORJECT_NAME}/example-image"
ここではDockerのビルドに kaniko を使っています。Dockerでビルドするより格段に簡単なのですが、弱点があります。それは kaniko イメージ内には curl も jq も入っておらず、かといってベースイメージが scratch のため、パッケージでインストールもできないことです。よって Configure OpenID Connect with GCP Workload Identity Federation や Configure OpenID Connect In Google Cloud の方法がそのまま使えません。
そこでここでは curl と jq の代わりに、BusyBox の wget, grep, sed を使ってやりくりしています。
FEDERATED_TOKEN
curl と jq のこれは、
    - |
      FEDERATED_TOKEN=$(curl -X POST
        --header "Content-Type: application/json" \
        --data "$PAYLOAD" \
        "https://sts.googleapis.com/v1/token" \
        | jq -r '.access_token' )
wget, grep, sed では次のようになります。
    - |
      FEDERATED_TOKEN=$(wget -qO- \
        --header="Content-Type: application/json" \
        --post-data="$PAYLOAD" \
        "https://sts.googleapis.com/v1/token" \
        | grep -o '"access_token": *"[^"]*"' \
        | sed 's/"access_token": *"\([^"]*\)"/\1/')
ACCESS_TOKEN
curl と jq のこれは、
    - |
      ACCESS_TOKEN=$(curl -X POST \
        --header "Content-Type: application/json" \
        --header "Authorization: Bearer $FEDERATED_TOKEN" \
        --data '{"scope": ["https://www.googleapis.com/auth/cloud-platform"]}' \
        "https://iamcredentials.googleapis.com/v1/projects/-/serviceAccounts/${GCP_SERVICEACCOUNT_EMAIL}:generateAccessToken" \
        | jq -r '.accessToken' )
wget, grep, sed では次のようになります。
    - |
      ACCESS_TOKEN=$(wget -qO- \
        --header="Content-Type: application/json" \
        --header="Authorization: Bearer $FEDERATED_TOKEN" \
        --post-data='{"scope": ["https://www.googleapis.com/auth/cloud-platform"]}' \
        "https://iamcredentials.googleapis.com/v1/projects/-/serviceAccounts/${GCP_SERVICEACCOUNT_EMAIL}:generateAccessToken" \
        | grep -o '"accessToken": *"[^"]*"' \
        | sed 's/"accessToken": *"\([^"]*\)"/\1/')
curl は wget で置き換えられますが、grep と sed は jq のように位置を特定しているわけではないので、厳密に機能を置き換えられているわけではありません。もしかするとなにかズレて動かなくなる可能性があることに注意が必要です。
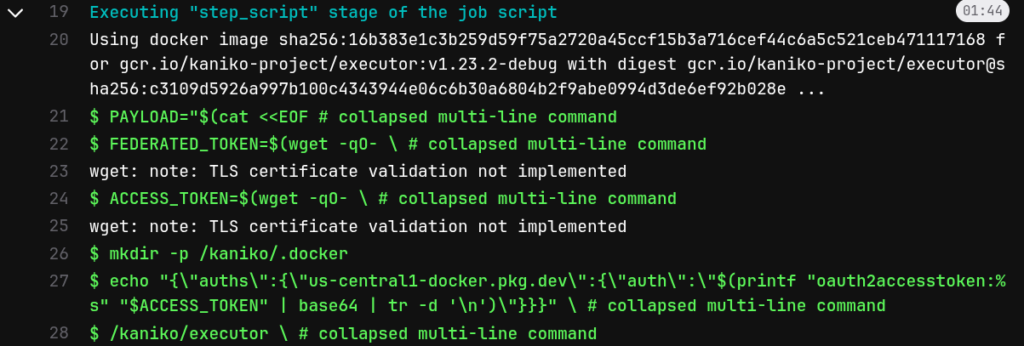
ビルド実行
これで次のようにビルドできました。
GitLabのレポジトリやCI/CD環境変数には、Google Cloudのサービスアカウントの機密情報は保存していません。ただ、BusyBox の wget はTLS証明書を検証していないようなので、これはちょっと微妙な気もします…(Enable https verification for wget or disable https)。
まとめ
GitLab CIとGoogle Artifact RegistryをWorkload Identity連携し、ビルドしたDockerイメージをプッシュできるようにしてみました。GitLabのレポジトリやCI/CD環境変数にGoogle Cloudの機密情報を保存していないので安全です。ただ、トークン取得時の wget で証明書を検証していないことや、そのイメージ自体が安全なのかなど、他にも気をつける点はさまざまあるため、これで絶対と言い切れるものではありません。引き続き、GitLab と Google Cloud の安全かつ簡単な運用を見ていきたいと思います。
Author
はやりの技術要素に加えて、会議の進め方・文章の書き方などの業務改善にも取り組んでいます。「Chef活用ガイド」共著のほか、Debian Official Developerもやっています。


