
LangGraphをLLMなしでちょっと触ってみよう #langgraph #langchain #ai #llm #python
この記事は1年以上前に投稿されました。情報が古い可能性がありますので、ご注意ください。
はじめに
LangGraphとは、LLM (Lagre Language Models; 大規模言語モデル)を使用した、ステートフルなエージェントやワークフローを作成するためのライブラリです。LLMを使用したアプリケーションを開発するためのフレームワークであるLangChainの兄弟といった感じです。
LangGraphを使うとゆくゆくはAIエージェントなどを容易に作れそうなので、まず取っ掛かりとしてLangGraphそのものがどういうものなのか、とExampleやTutorialsを開いてみます。すると最初からLLM関連コードが入っているので、LangGraphそのものを知りたいという向きには少ししんどいなと感じました。
そこでLLM関連コードをまったく書かず、LangGraphそのものの動きを見るためのコードを調べながら書いてみたので本稿でご紹介したいと思います。LangGraphの文法や仕様などは詳しく触れません。それらに関しては公式ドキュメントも併せてご覧ください。
また、次の記事を参考にさせていただきました。
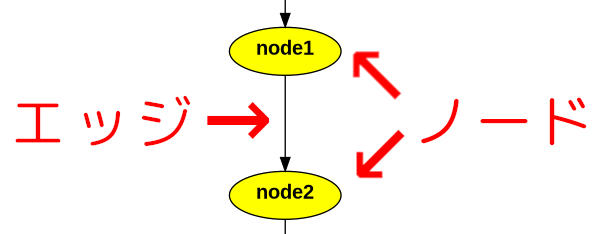
「ノード」と「エッジ」
まず「グラフ」という概念において、点である「ノード」と線である「エッジ」という構成要素を押さえておく必要がありそうです。LangGraphにおいても、処理を担当する「ノード」と処理同士を接続する「エッジ」という、次のような図になりそうです。

2つのノードを接続する
valueを1にするnode1valueを2にするnode2
と2つのノードがあり、
- 処理は
node1からnode2に進む
というエッジで2つのノードを接続するとします。また、
node1から始まるnode2で終わる
という流れとします。ここで value の初期値を 0 として開始するLangGraphスクリプトを書いてみました。
from typing_extensions import TypedDict
from langgraph.graph import StateGraph

# グラフ内で受け渡しされるステートフルなオブジェクトの宣言
class State(TypedDict):
    value: str

# value を 1 にする node1
def node1(state: State):
    return {"value": "1"}

# value を 2 にする node2
def node2(state: State):
    return {"value": "2"}

# ステートフルなグラフの初期化
workflow = StateGraph(State)

# グラフにノードを追加
workflow.add_node("node1", node1)
workflow.add_node("node2", node2)

# グラフにエッジを追加: 処理は node1 から node2 に進む
workflow.add_edge("node1", "node2")

# node1 から始まる
workflow.set_entry_point("node1")

# node2 で終わる
workflow.set_finish_point("node2")

# グラフをコンパイル
app = workflow.compile()

# グラフをアスキーアートで表示
app.get_graph().print_ascii()

# グラフを実行、引数は値の初期値
print(app.invoke({"value": "0"}))
このような形になります。 add_node と add_edge の字面が似ているので並んでいると目が滑るのですが…。コメントを入れたり、LangGraphの理解が進めば見分けがつくようになってくるかなと思います。また、LLM関係のコードを含めず、純粋にLangGraphのみのコードになっているので、まだ何をやっているか分かりやすいはずです。
これを実行すると次のようになります。
+-----------+
| __start__ |
+-----------+
      *
      *
      *
  +-------+
  | node1 |
  +-------+
      *
      *
      *
  +-------+
  | node2 |
  +-------+
      *
      *
      *
 +---------+
 | __end__ |
 +---------+
{'value': '2'}
value が 0 で開始し、 2 となって終わりました。途中の 1 となっているところが見えませんが、スクリプトの最終行を、
print(app.invoke({"value": "0"} ,debug=True))
とすることでデバッグ出力が有効となり、次のように途中経過もわかるようになります。
[-2:checkpoint] State at the end of step -2:
{}
[0:tasks] Starting step 0 with 1 task:
- __start__ -> {'value': '0'}
[0:writes] Finished step 0 with writes to 1 channel:
- value -> '0'
[-2:checkpoint] State at the end of step -2:
{'value': '0'}
[1:tasks] Starting step 1 with 1 task:
- node1 -> {'value': '0'}
[1:writes] Finished step 1 with writes to 1 channel:
- value -> '1'
[-2:checkpoint] State at the end of step -2:
{'value': '1'}
[2:tasks] Starting step 2 with 1 task:
- node2 -> {'value': '1'}
[2:writes] Finished step 2 with writes to 1 channel:
- value -> '2'
グラフの条件分岐
グラフに条件分岐を作ります。特に注目するところだけにコメントをつけていきます。
from typing import Literal
from typing_extensions import TypedDict
from langgraph.graph import StateGraph
import random

class State(TypedDict):
    value: str

def start_node(state: State):
    return {"value": "start"}

def east_node(state: State):
    return {"value": "east"}

def west_node(state: State):
    return {"value": "west"}

def end_node(state: State):
    return {"value": state["value"]}

workflow = StateGraph(State)

workflow.add_node("start_node", start_node)
workflow.add_node("east_node",  east_node)
workflow.add_node("west_node",  west_node)
workflow.add_node("end_node",   end_node)

workflow.set_entry_point("start_node")

# ランダムに east_node か west_node に分岐
def routing(state: State) -> Literal["east_node", "west_node"]:
    if random.randint(0,1) == 0:
       return "east_node"
    else:
       return "west_node"

# グラフに条件分岐エッジを追加
workflow.add_conditional_edges("start_node", routing)

workflow.add_edge("east_node", "end_node")
workflow.add_edge("west_node", "end_node")

workflow.set_finish_point("end_node")

app = workflow.compile()
app.get_graph().print_ascii()
print(app.invoke({"value": "0"}))
start_node から開始し、ランダムに east_node か west_node を通り、 end_node で終了します。
            +-----------+
            | __start__ |
            +-----------+
                  *
                  *
                  *
            +------------+
            | start_node |
            +------------+
           ...         ...
          .               .
        ..                 ..
+-----------+           +-----------+
| east_node |           | west_node |
+-----------+           +-----------+
           ***         ***
              *       *
               **   **
            +----------+
            | end_node |
            +----------+
                  *
                  *
                  *
             +---------+
             | __end__ |
             +---------+
{'value': 'east'}
実行するたびに、最終結果が {'value': 'east'} か {'value': 'west'} になります。ランダムなので、同じ結果が続くこともあります。
値の追加
これまでは value という str 形式の値を上書きしていました。ここでは str 形式の値を要素として持つ list 形式として値を追加してみます。
from typing import Annotated
from typing_extensions import TypedDict
from langgraph.graph import StateGraph
from operator import add

# グラフ内で受け渡しされるステートフルなオブジェクトの宣言
# list[str] には add (追加) を行う
class State(TypedDict):
    value: Annotated[list[str], add]

# value に「node1」を追加する node1
def node1(state: State):
    return {"value": ["node1"]}

# value に「node2」を追加する node2
def node2(state: State):
    return {"value": ["node2"]}

workflow = StateGraph(State)

workflow.add_node("node1", node1)
workflow.add_node("node2", node2)

workflow.add_edge("node1", "node2")

workflow.set_entry_point("node1")
workflow.set_finish_point("node2")

app = workflow.compile()
app.get_graph().print_ascii()
print(app.invoke({"value": []}))
これを実行すると次のようになります。
+-----------+
| __start__ |
+-----------+
      *
      *
      *
  +-------+
  | node1 |
  +-------+
      *
      *
      *
  +-------+
  | node2 |
  +-------+
      *
      *
      *
 +---------+
 | __end__ |
 +---------+
{'value': ['node1', 'node2']}
初期値 [] で開始した value に要素が2つ追加され、 ['node1', 'node2'] で終了していることがわかります。
2つのノードを並列実行
先程は2つのノードを条件分岐、つまりどちらか1つだけを実行していましたが、今回は2つのノードを並列実行してみます。
from typing import Annotated, Literal
from typing_extensions import TypedDict
from langgraph.graph import StateGraph
from operator import add

class State(TypedDict):
    value: Annotated[list[str], add]

def start_node(state: State):
    return {"value": ["start"]}

def east_node(state: State):
    return {"value": ["east"]}

def west_node(state: State):
    return {"value": ["west"]}

def end_node(state: State):
    return {"value": ["end"]}

workflow = StateGraph(State)

workflow.add_node("start_node", start_node)
workflow.add_node("east_node",  east_node)
workflow.add_node("west_node",  west_node)
workflow.add_node("end_node",   end_node)

workflow.set_entry_point("start_node")

# start_node から east_node と west_node で分岐
workflow.add_edge("start_node", "east_node")
workflow.add_edge("start_node", "west_node")

# east_node と west_node から end_node へ合流
workflow.add_edge(["east_node", "west_node"], "end_node")

workflow.set_finish_point("end_node")

app = workflow.compile()
app.get_graph().print_ascii()
print(app.invoke({"value": []}))
条件分岐のときは add_conditional_edges が必要でしたが、並列実行する際は単純に add_edge で複数のエッジを引くだけでOKです。
            +-----------+
            | __start__ |
            +-----------+
                  *
                  *
                  *
            +------------+
            | start_node |
            +------------+
           ***         ***
          *               *
        **                 **
+-----------+           +-----------+
| east_node |           | west_node |
+-----------+           +-----------+
           ***         ***
              *       *
               **   **
            +----------+
            | end_node |
            +----------+
                  *
                  *
                  *
             +---------+
             | __end__ |
             +---------+
{'value': ['start', 'east', 'west', 'end']}
このように特別なコードを書かずとも、並列実行できています。
ノード数が異なる並列実行
ノードが2つのルートと、ノードが1つのルートに分岐し、並列実行します。
from typing import Annotated, Literal
from typing_extensions import TypedDict
from langgraph.graph import StateGraph
from operator import add

class State(TypedDict):
    value: Annotated[list[str], add]

def start_node(state: State):
    return {"value": ["start"]}

def east1_node(state: State):
    return {"value": ["east1"]}

def east2_node(state: State):
    return {"value": ["east2"]}

def west_node(state: State):
    return {"value": ["west"]}

def end_node(state: State):
    return {"value": ["end"]}

workflow = StateGraph(State)

workflow.add_node("start_node", start_node)
workflow.add_node("east1_node",  east1_node)
workflow.add_node("east2_node",  east2_node)
workflow.add_node("west_node",  west_node)
workflow.add_node("end_node",   end_node)

workflow.set_entry_point("start_node")

# start_node から east1_node、east1_node から east2_node へ
workflow.add_edge("start_node", "east1_node")
workflow.add_edge("east1_node", "east2_node")

# start_node から west_node へ
workflow.add_edge("start_node", "west_node")

# east2_node と west_node から end_node へ合流
workflow.add_edge(["east2_node", "west_node"], "end_node")

workflow.set_finish_point("end_node")

app = workflow.compile()
app.get_graph().print_ascii()

print(app.invoke({"value": []}))
この場合も特別なコードを書く必要はありません。
             +-----------+
             | __start__ |
             +-----------+
                   *
                   *
                   *
            +------------+
            | start_node |
            +------------+
            ***          **
           *               **
         **                  **
+------------+                 **
| east1_node |                  *
+------------+                  *
       *                        *
       *                        *
       *                        *
+------------+           +-----------+
| east2_node |           | west_node |
+------------+           +-----------+
            ***         ***
               *       *
                **   **
             +----------+
             | end_node |
             +----------+
                   *
                   *
                   *
              +---------+
              | __end__ |
              +---------+
{'value': ['start', 'east1', 'west', 'east2', 'end']}
アスキーアートでは east2_node と west_node が横に並んでいるので west_node が待たされているように見えますが、実際は east1_node と west_node が先に実行されています。
さらにノード数が異なる並列実行
east1_nodeeast2_nodewest_nodenorth1_nodenorth2_nodenorth3_node
の3ルートを並列実行してみます。
from typing import Annotated, Literal
from typing_extensions import TypedDict
from langgraph.graph import StateGraph
from operator import add

class State(TypedDict):
    value: Annotated[list[str], add]

def start_node(state: State):
    return {"value": ["start"]}

def east1_node(state: State):
    return {"value": ["east1"]}

def east2_node(state: State):
    return {"value": ["east2"]}

def west_node(state: State):
    return {"value": ["west"]}

def north1_node(state: State):
    return {"value": ["north1"]}

def north2_node(state: State):
    return {"value": ["north2"]}

def north3_node(state: State):
    return {"value": ["north3"]}

def end_node(state: State):
    return {"value": ["end"]}

workflow = StateGraph(State)

workflow.add_node("start_node",  start_node)
workflow.add_node("east1_node",  east1_node)
workflow.add_node("east2_node",  east2_node)
workflow.add_node("west_node",   west_node)
workflow.add_node("north1_node", north1_node)
workflow.add_node("north2_node", north2_node)
workflow.add_node("north3_node", north3_node)
workflow.add_node("end_node",    end_node)

workflow.set_entry_point("start_node")

workflow.add_edge("start_node", "east1_node")
workflow.add_edge("east1_node", "east2_node")

workflow.add_edge("start_node", "west_node")

workflow.add_edge("start_node",  "north1_node")
workflow.add_edge("north1_node", "north2_node")
workflow.add_edge("north2_node", "north3_node")

workflow.add_edge(["east2_node", "west_node", "north3_node"], "end_node")

workflow.set_finish_point("end_node")

app = workflow.compile()
app.get_graph().print_ascii()
print(app.invoke({"value": []}))
これを実行してみます。
                          +-----------+
                          | __start__ |
                          +-----------+
                                 *
                                 *
                                 *
                          +------------+
                          | start_node |
                       ***+------------+****
                   ****          *          ****
               ****              *              ****
            ***                  *                  ****
+-------------+                  *                      ***
| north1_node |                  *                        *
+-------------+                  *                        *
        *                        *                        *
        *                        *                        *
        *                        *                        *
+-------------+                  *                 +------------+
| north2_node |                  *                 | east1_node |
+-------------+                  *                 +------------+
        *                        *                        *
        *                        *                        *
        *                        *                        *
+-------------+           +-----------+            +------------+
| north3_node |           | west_node |            | east2_node |
+-------------+****       +-----------+         ***+------------+
                   ****          *          ****
                       ****      *      ****
                           ***   *   ***
                           +----------+
                           | end_node |
                           +----------+
                                 *
                                 *
                                 *
                           +---------+
                           | __end__ |
                           +---------+
{'value': ['start', 'east1', 'west', 'north1', 'east2', 'north2', 'north3', 'end']}
このような結果になりました。アスキーアートではズレてしまっていますが、 east1_node west_node north1_node がまず実行され、次に east2_node north2_node が実行、最後に north3_node が実行されています。並列実行とは言いますが結果を見てみると、グラフに追加した順番でノードが実行されていることに注目してください。
ループ実行
ここまでは明示的に複数のノードを追加していましたが、ループを用いて複数のノードを追加します。
from typing import Annotated, Literal
from typing_extensions import TypedDict
from langgraph.graph import StateGraph
from operator import add
import random
from langgraph.constants import Send

class State(TypedDict):
    value: Annotated[list[str], add]
    num: int

def start_node(state: State):
    return

def proc_node(state: State):
    return {"value": [state["num"]]}

# 3回ループ
def continue_to_proc(state: State):
    return [Send("proc_node", {"num": i}) for i in range(3)]

def end_node(state: State):
    return

workflow = StateGraph(State)

workflow.add_node("start_node", start_node)
workflow.add_node("proc_node",  proc_node)
workflow.add_node("end_node",   end_node)

workflow.set_entry_point("start_node")

workflow.add_conditional_edges("start_node", continue_to_proc, ["proc_node"])

workflow.add_edge("proc_node", "end_node")

workflow.set_finish_point("end_node")

app = workflow.compile()
app.get_graph().print_ascii()
print(app.invoke({"value": []}))
次のようになります。
+-----------+
| __start__ |
+-----------+
       *
       *
       *
+------------+
| start_node |
+------------+
       .
       .
       .
+-----------+
| proc_node |
+-----------+
       *
       *
       *
 +----------+
 | end_node |
 +----------+
       *
       *
       *
  +---------+
  | __end__ |
  +---------+
{'value': [0, 1, 2]}
アスキーアートからはわかりませんが proc_node が3回実行されています。
開始と終了を略記する
START と END を使うと、開始ノードと終了ノードの明示的な用意や set_entry_point と set_finish_point の指定が不要になります。
from typing import Annotated, Literal
from typing_extensions import TypedDict
from langgraph.graph import StateGraph, START, END
from operator import add
import random
from langgraph.constants import Send

class State(TypedDict):
    value: Annotated[list[str], add]
    num: int

def proc_node(state: State):
    return {"value": [state["num"]]}

def continue_to_proc(state: State):
    return [Send("proc_node", {"num": i}) for i in range(3)]

workflow = StateGraph(State)

workflow.add_node("proc_node",  proc_node)

# START から始める
workflow.add_conditional_edges(START, continue_to_proc, ["proc_node"])

# END で終わる
workflow.add_edge("proc_node", END)

app = workflow.compile()
app.get_graph().print_ascii()
print(app.invoke({"value": []}))
すっきり書けました。
+-----------+
| __start__ |
+-----------+
      .
      .
      .
+-----------+
| proc_node |
+-----------+
      *
      *
      *
 +---------+
 | __end__ |
 +---------+
{'value': [0, 1, 2]}
グラフの描画もすっきりしており、結果も変わりません。
ワークフローのモックアップ
突然複雑なことをやってみます。
- 日本語で質問文を受け取る。
- 日本語の質問文を英訳・要約する。
- 英語の質問文でウェブ検索する。
- 検索でヒットしたURLを取得・日本語訳・要約する。
- 結果を出力する。
というモックアップを作ります。あくまでモックアップなので実際に翻訳や要約などはしません。LangGraphで処理の流れをどう表現するのか、という観点に絞っています。
from typing import Annotated, Literal
from typing_extensions import TypedDict
from langgraph.graph import StateGraph, START, END
from operator import add
from langgraph.constants import Send

class State(TypedDict):
    question: str
    urls: list[str]
    answers: Annotated[list[dict], add]

class IterState(TypedDict):
    url: str

def translate_summerize_question(state: State):
    # XXX: 英訳・要約処理
    translate_summerize_q = "What is Docker?"
    return {"question": translate_summerize_q}

def search_web(state: State):
    # XXX: 検索処理
    urls = [
        "https://docs.docker.com/get-started/docker-overview/",
        "https://aws.amazon.com/docker/",
        "https://www.ibm.com/topics/docker",
        "https://www.techtarget.com/searchitoperations/definition/Docker",
        "https://www.geeksforgeeks.org/introduction-to-docker/",
    ]
    return {"urls": urls}

def scrape_translate_summerize_web(state: IterState):
    url = state["url"]
    # XXX: ウェブ取得・翻訳・要約処理
    content = url.replace("https://","").replace("/","_")
    return {"answers": [{url: content}]}

def continue_to_scrape(state: State):
    return [Send("scrape_translate_summerize_web", {"url": s}) for s in state["urls"]]

workflow = StateGraph(State)

workflow.add_node("translate_summerize_question", translate_summerize_question)
workflow.add_node("search_web", search_web)
workflow.add_node("scrape_translate_summerize_web", scrape_translate_summerize_web)

workflow.add_edge(START, "translate_summerize_question")
workflow.add_edge("translate_summerize_question", "search_web")
workflow.add_conditional_edges("search_web", continue_to_scrape, ["scrape_translate_summerize_web"])
workflow.add_edge("scrape_translate_summerize_web", END)

app = workflow.compile()
app.get_graph().print_ascii()
stats = app.invoke({"question": "Dockerとは何ですか?"})

print()
print("question: " + stats["question"])
print()

for a in stats["answers"]:
    print(a)
次のような結果になります。
          +-----------+
          | __start__ |
          +-----------+
                 *
                 *
                 *
 +------------------------------+
 | translate_summerize_question |
 +------------------------------+
                 *
                 *
                 *
          +------------+
          | search_web |
          +------------+
                 .
                 .
                 .
+--------------------------------+
| scrape_translate_summerize_web |
+--------------------------------+
                 *
                 *
                 *
            +---------+
            | __end__ |
            +---------+

question: What is Docker?

{'https://docs.docker.com/get-started/docker-overview/': 'docs.docker.com_get-started_docker-overview_'}
{'https://aws.amazon.com/docker/': 'aws.amazon.com_docker_'}
{'https://www.ibm.com/topics/docker': 'www.ibm.com_topics_docker'}
{'https://www.techtarget.com/searchitoperations/definition/Docker': 'www.techtarget.com_searchitoperations_definition_Docker'}
{'https://www.geeksforgeeks.org/introduction-to-docker/': 'www.geeksforgeeks.org_introduction-to-docker_'}
ワークフローをLangGraphで表現することができました。あとはこれをもとに、実際にLLMやウェブ取得処理などを組み込んでいくことになりますが、本稿の趣旨から外れるので一旦ここまでとしておきます。
まとめ
本稿ではLangGraphそのものの動きを見るために、LLM関連コードをまったく書かずにワークフローグラフを表現することのみに焦点を絞ってコードを書いてみました。LangGraphに集中することができたので理解が進み、この後でLLM関連コードを追加したり、さらにLangGraphの機能を使ったりする上での土台になったかと思います。多分LLM関連コードが含まれたLangGraphのコードを見ても目が滑らなくなったはずです。
今後は引き続き、LLM関連コードを含めたものや、さらに複雑なワークフローの作成に挑戦していこうと思います。続報をお待ちください。
Author
はやりの技術要素に加えて、会議の進め方・文章の書き方などの業務改善にも取り組んでいます。「Chef活用ガイド」共著のほか、Debian Official Developerもやっています。


