
Cloudflareで始める:Cloudflare WorkersからLLMを使う
はじめに
Cloudflareという会社の名前を聞いたことがある人でも、CloudflareはCDN屋さんやDDoS対策屋さん、WAF屋さん、あるいはDNS屋さんだと思っている思っている人は多いのではないでしょうか。
この(勝手に始めた)「Cloudflareで始める」シリーズでは、クラウド事業者としてのCloudflareの知られざる実力を暴いていきたいと思います!
Cloudflareがどのような会社か、他社と比較してどうなのか等は特に述べません。
前回の記事
シリーズ前回の記事はこちらです。
Cloudflareで始める:Cloudflare Tunnelを使ったwebサーバ公開
注意事項
サービス内容やコストなどは執筆時点の情報になります。最新の情報と相違無いか確認しつつ活用してください。
今回の題材
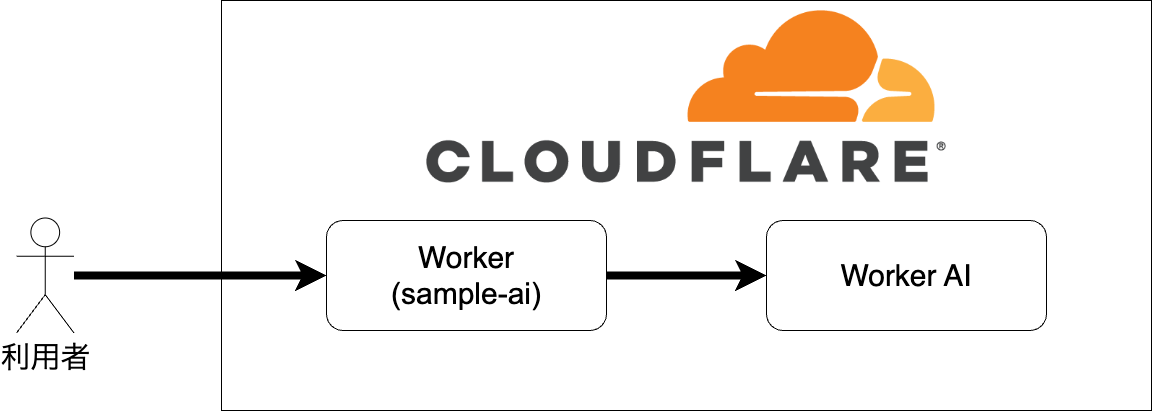
今回はAI/LLMを使ったサービス...ではなく、Cloudflare Workers AIを使いCloudflare WorkersからLLMを使います。
他社サービスで類似しているものを挙げると、Amazon Bedrock, Azure OpenAI Service, GCP Vertex AI Platform辺りでしょうか。
Cloudflare Workers AIは基本的にはオープンアクセス可能なモデルを使うためのサービスで、OpenAIのGPT-4.1やGoogleのGemini 2.5 Proなどよく目にする非公開のモデルは執筆時点では扱えません。
しかし、無料枠が設けられているので気軽に開発が始められます。
実際に利用できるモデルの一覧はこちらを参照してください: https://developers.cloudflare.com/workers-ai/models/
内容的には下記の公式ドキュメントの焼き直しになるので、情報が古い等ありましたらそちらを参照してください。
https://developers.cloudflare.com/workers-ai/get-started/workers-wrangler
課金方式
Cloudflare Workers AIでは実際に費やした計算量で料金が計算され、計算量はNeuronsという単位で示されます。
モデルにより恣意的な価格操作が行いにくく、また画像や音声生成でも流用できる基準として優れています。
2025年7月17日現在は0.011米ドル/1,000 Neuronsとなっています。
他社LLMサービスでも一般的な100万トークン単位で換算された単位も提供されます。
無料枠について
1日あたり10,000 Neuronsまで無料です。
リセットはUTCの0時なので日本時間では午前9時になります。
Cloudflare Workersの料金
今回はCloudflare Workers経由で利用するので、Cloudflare Workersの利用料金もかかります。
が、検証は小規模なのでFreeプランで実施します。
本筋からは外れるので、詳細な料金設定や制約が知りたい方はドキュメントを参照してください。
https://developers.cloudflare.com/workers/platform/pricing
検証
今回はTerraformを用いません。
コマンドやweb UIの操作で構成を完結させます。
今回やる事
- Workerをデプロイする
- 上記workerとCloudflare Workers AIを連携させる
- コード上で静的に定義された質問に答えてもらう
(技術的に可能だけど)今回やらない事
- LLMに対して任意の入力を可能にする
- Workerへ第三者がアクセスできないようアクセス制限をかける
- Workerを使わず、REST API経由でLLMを使う
- WorkerからOpenAI互換APIを使う
前提
- Cloudflareにアカウントを作成済み
- 公式サイト https://www.cloudflare.com/ja-jp/ からサインアップできます
- FreeプランでOKです
- もしかしたら決済方法を要求されるかもしれないので、クレジットカード、PayPalなどCloudflareで有効な支払い方法が用意できる
- 用途はCloudflare Workersの利用登録で、課金が発生しない構成でも決済方法の登録が必要な場合があります
- Node.jsをインストール済み
検証環境
- 作業PC
- Node.js 22.15.0
- npm 10.9.2
構築手順
雛形の作成
npm create cloudflare@latest -- sample-aiコマンドを実行し、- sample-aiという名前のworkerが最終的にデプロイされます。
- 途中の質問には下記の通り回答しました
- In which directory do you want to create your application?
- (初期値そのまま)
- What would you like to start with?
- Hello World example
- Which template would you like to use?
- Worker only
- Which language do you want to use?
- TypeScript
- Do you want to use git for version control?
- Yes (git管理不要な方、gitが何か分からない方はNoで大丈夫です)
- Do you want to deploy your application?
- no (内容を編集してからデプロイするため)
- In which directory do you want to create your application?
npm create cloudflare@latest -- sample-ai
Need to install the following packages:
create-cloudflare@2.47.2
Ok to proceed? (y)


> npx
> create-cloudflare sample-ai


──────────────────────────────────────────────────────────────────────────────────────────────────────────
👋 Welcome to create-cloudflare v2.47.2!
🧡 Let's get started.
📊 Cloudflare collects telemetry about your usage of Create-Cloudflare.

Learn more at: https://github.com/cloudflare/workers-sdk/blob/main/packages/create-cloudflare/telemetry.md
──────────────────────────────────────────────────────────────────────────────────────────────────────────

╭ Create an application with Cloudflare Step 1 of 3
│
├ In which directory do you want to create your application?
│ dir ./sample-ai
│
├ What would you like to start with?
│ category Hello World example
│
├ Which template would you like to use?
│ type Worker only
│
├ Which language do you want to use?
│ lang TypeScript
│
├ Copying template files
│ files copied to project directory
│
├ Updating name in `package.json`
│ updated `package.json`
│
├ Installing dependencies
│ installed via `npm install`
│
╰ Application created

╭ Configuring your application for Cloudflare Step 2 of 3
│
├ Installing wrangler A command line tool for building Cloudflare Workers
│ installed via `npm install wrangler --save-dev`
│
├ Retrieving current workerd compatibility date
│ compatibility date 2025-05-25
│
├ Generating types for your application
│ generated to `./worker-configuration.d.ts` via `npm run cf-typegen`
│
├ Do you want to use git for version control?
│ yes git
│
├ Initializing git repo
│ initialized git
│
└ git commit -m 'Initial commit (by create-cloudflare CLI)

Details:
┐ git commit -m 'Initial commit (by create-cloudflare CLI)
├ Committing new files
│ git commit
│
╰ Application configured

╭ Deploy with Cloudflare Step 3 of 3
│
├ Do you want to deploy your application?
│ no deploy via `npm run deploy`
│
╰ Done

────────────────────────────────────────────────────────────
🎉  SUCCESS  Application created successfully!

💻 Continue Developing
Change directories: cd sample-ai
Start dev server: npm run start
Deploy: npm run deploy

📖 Explore Documentation
https://developers.cloudflare.com/workers

🐛 Report an Issue
https://github.com/cloudflare/workers-sdk/issues/new/choose

💬 Join our Community
https://discord.cloudflare.com
────────────────────────────────────────────────────────────
雛形を編集
- sample-aiディレクトリができているので、VSCodeなどのエディタで開く
- wrangler.jsoncを下記のように修正する
- この設定でenv.AIからCloudflare Workers AIにアクセスできるようになります。
{
	"$schema": "node_modules/wrangler/config-schema.json",
	"name": "sample-ai",
	"main": "src/index.ts",
	"compatibility_date": "2025-05-25",
	"observability": {
		"enabled": true
	},
	// ↑に,を追加してここから下を追加
	"ai": {
		"binding": "AI"
	}
	// ここまでを追加
}
3. src/index.tsを下記のように書き換えます
- モデル名や質問はドキュメントのものからアレンジしました
export interface Env {
  // If you set another name in the Wrangler config file as the value for 'binding',
  // replace "AI" with the variable name you defined.
  AI: Ai;
}

export default {
  async fetch(request, env): Promise<Response> {
    const response = await env.AI.run("@cf/meta/llama-3.2-1b-instruct", {
      prompt: "フランスの首都はどこですか?",
    });

    return new Response(JSON.stringify(response));
  },
} satisfies ExportedHandler<Env>;
デプロイ・動作確認
- Cloudflareにデプロイするため、Cloudflare Developer Platform CLIであるWranglerで認証を通す
npx wrangler loginコマンドを実行すると下記のような画面が出るので、Allowする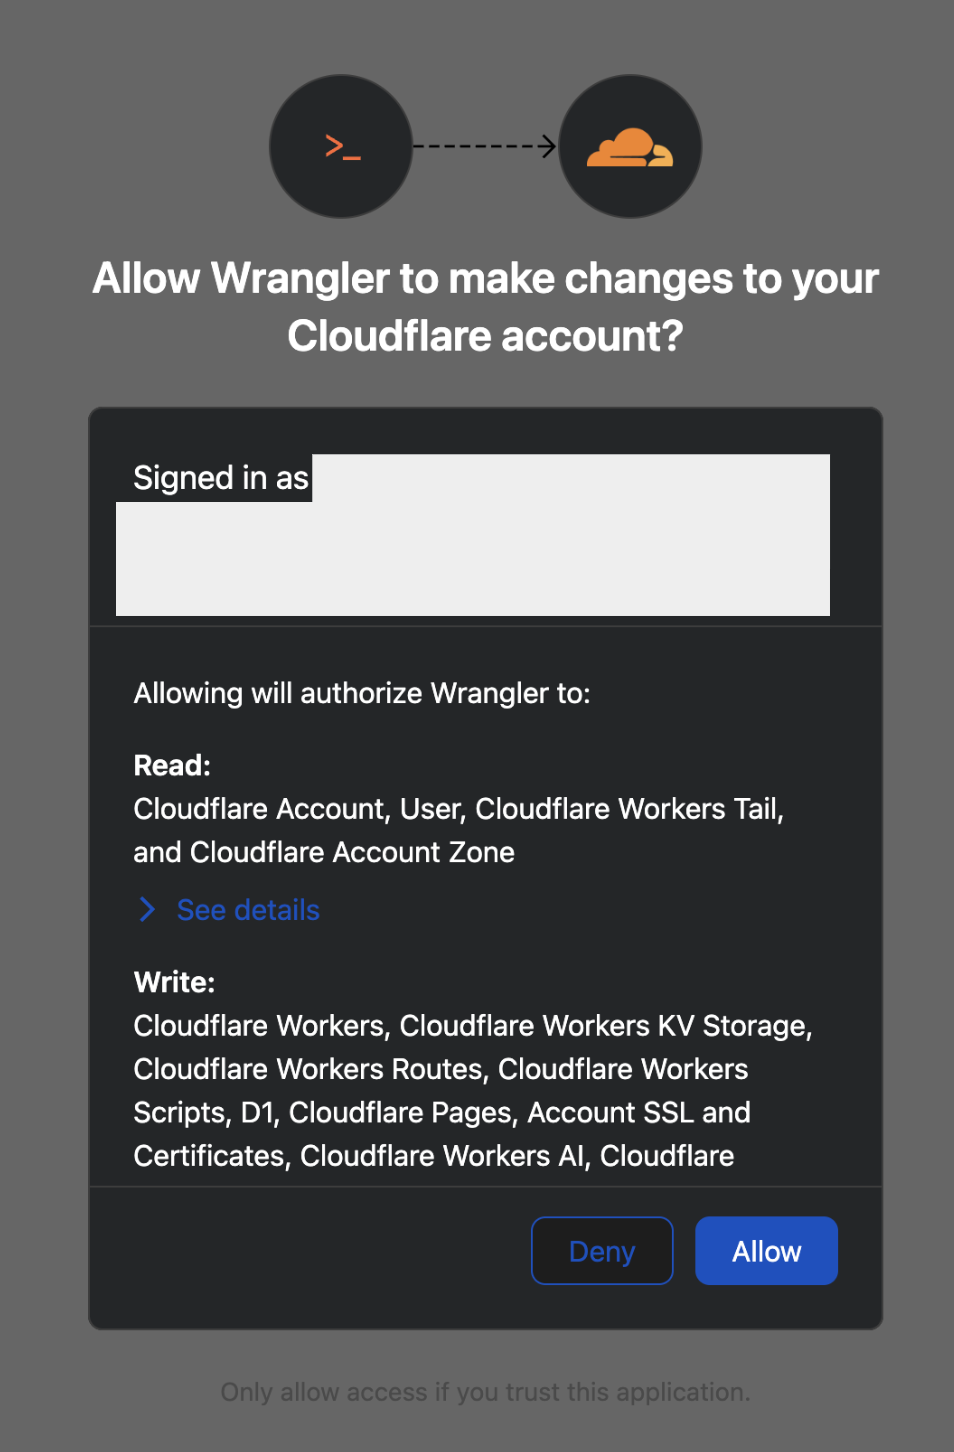
- 認証情報を使い、npx wrangler deployコマンドでデプロイする
npx wrangler deploy

 ⛅️ wrangler 4.16.1
-------------------

✔ Select an account › *******'s Account
Total Upload: 0.19 KiB / gzip: 0.16 KiB
Your Worker has access to the following bindings:
- AI:
  - Name: AI
Uploaded sample-ai (1.66 sec)
Deployed sample-ai triggers (0.74 sec)
  https://sample-ai.******.workers.dev
Current Version ID: ****
3. しばらく待ち、上記のコマンドの結果表示されるURLにアクセスすると、LLMから「フランスの首都はどこですか?」という質問への回答が得られる
- NXDOMAINなど、名前解決ができない・ホストが見つからない旨のエラーが出る場合には10分、15分ぐらい間をおいて再チャレンジしてみてください。
curl https://sample-ai.******.workers.dev | jq .

{
  "response": "パリです。",
  "usage": {
    "prompt_tokens": 53,
    "completion_tokens": 5,
    "total_tokens": 58
  }
}
Workerの削除
最後に、後片付けとしてデプロイしたworkerを削除しましょう。
npx wrangler delete

 ⛅️ wrangler 4.24.3 (update available 4.24.4)
─────────────────────────────────────────────
✔ Are you sure you want to delete sample-ai? This action cannot be undone. … yes
Successfully deleted sample-ai
おわりに
今回はCloudflare WorkersからLLMを使ってみました。
応用するとLLMを使ったサービスを構築できるので、是非お試しください!
脚注
米国およびその他の管轄区域において、Cloudflare、Cloudflareのロゴ、Cloudflare Workersは、Cloudflare, Inc.の商標および/または登録商標です。


