
GitLab DuoでUTを自動作成 #GitLab #GitLabDuo #AI

この記事は1年以上前に投稿されました。情報が古い可能性がありますので、ご注意ください。
はじめに
GitLab Duoはソフトウェア開発ライフサイクル全体でAIを活用できる枠組みです。
GitLab Duoには様々な機能(一覧)が含まれています。今回はAIに自動テスト(UT)を作成してもらう機能を試してみましょう。
チャレンジ内容
以前作成した弁当注文アプリに対してGitLab Duoを使ってUTを自動作成してみます。
作成された自動テストの内容を確認して、よくできている点や修正が必要な点を評価していきます。
また、GitHub CopilotでのUT自動作成とも比較してみます。
テスト対象のコンポーネント
弁当注文アプリのテスト対象コンポーネントは下記の通りです。
import React, { useCallback, useState } from 'react';
import { mkConfig, generateCsv, download } from 'export-to-csv';

import awsExports from './aws-exports';
import { Amplify } from 'aws-amplify';
import { generateClient } from 'aws-amplify/api';
import { createBento } from './graphql/mutations';
import { CreateBentoInput } from './API';

import I_hamburger from './image/28206674_s.jpg';
import I_karaage from './image/28796399_s.jpg';
import I_makunouchi from './image/28927123_s.jpg';
import I_hirekatsu from './image/28939604_s.jpg';
import { listBentos } from './graphql/queries';

Amplify.configure(awsExports);

// v0 by Vercel.
// https://v0.dev/t/w1UzOcXfEI5
export default function Main() {
  type Bento = {
    id: number;
    name: string;
    imageUrl: string;
  };
  const bentoList: Bento[] = [
    { id: 1, name: 'ハンバーグ', imageUrl: I_hamburger },
    { id: 2, name: '唐揚げ', imageUrl: I_karaage },
    { id: 3, name: '幕の内', imageUrl: I_makunouchi },
    { id: 4, name: 'ヒレカツ', imageUrl: I_hirekatsu },
  ];

  const [employeeNumber, setEmployeeNumber] = useState('');

  const onClick: React.MouseEventHandler<HTMLDivElement> = useCallback(
    async (e) => {
      if (employeeNumber === '') {
        alert('社員番号が入力されていません。');
        return;
      }

      const bentoId = parseInt(e.currentTarget.dataset.bentoId ?? '');
      const answer = confirm(bentoList.find((bento) => bento.id === bentoId)?.name + ' を注文しますか?');
      if (!answer) {
        return;
      }

      // 注文処理。
      const input: CreateBentoInput = {
        date: Date.now(),
        employeeNumber: employeeNumber,
        bentoId: bentoId,
      };
      const response = await generateClient().graphql({ query: createBento, variables: { input: input } });
      if (response.errors) {
        throw new Error();
      }

      alert('注文しました。');
    },
    [employeeNumber],
  );

  const downloadCsv: React.MouseEventHandler<HTMLButtonElement> = async () => {
    const csvConfig = mkConfig({
      useKeysAsHeaders: true,
      filename: 'orders',
    });

    const response = await generateClient().graphql({ query: listBentos });
    if (response.errors) {
      throw new Error();
    }

    type CsvRecord = {
      date: string;
      employeeNumber: string;
      bentoId: number;
    };
    const records: CsvRecord[] = response.data.listBentos.items.map((item) => {
      return {
        date: new Date(item.date).toJSON(),
        employeeNumber: item.employeeNumber,
        bentoId: item.bentoId,
      };
    });

    const csv = generateCsv(csvConfig)(records);
    download(csvConfig)(csv);
  };

  return (
    <div className="flex flex-col items-center justify-center min-h-screen py-12 space-y-4 md:py-24">
      <div className="grid gap-4 w-full max-w-sm p-4 sm:max-w-md">
        <div className="grid gap-2">
          <label className="text-sm font-medium leading-none peer-disabled:cursor-not-allowed peer-disabled:opacity-70" htmlFor="employee-number">
            Employee number
          </label>
          <input
            className="flex h-10 w-full rounded-md border border-input bg-background px-3 py-2 text-sm ring-offset-background file:border-0 file:bg-transparent file:text-sm file:font-medium placeholder:text-muted-foreground focus-visible:outline-none focus-visible:ring-2 focus-visible:ring-ring focus-visible:ring-offset-2 disabled:cursor-not-allowed disabled:opacity-50"
            id="employee-number"
            placeholder="Enter employee number"
            value={employeeNumber}
            onChange={(e) => setEmployeeNumber(e.target.value)}
          />
        </div>

        <div className="grid gap-2 mt-10">
          <label className="leading-none peer-disabled:cursor-not-allowed peer-disabled:opacity-70">Choose your bento</label>
          <div className="grid gap-2 md:grid-cols-2">
            {bentoList.map((bento) => (
              <div key={bento.id} data-bento-id={bento.id} className="flex items-center gap-2 cursor-pointer mt-2 bg-stone-800" onClick={onClick}>
                <img alt={bento.name} className="aspect-square rounded-md object-cover" height="100" src={bento.imageUrl} width="100" />
                <span className="text-center text-base">{bento.name}</span>
              </div>
            ))}
          </div>
        </div>

        <button
          className="mt-20 inline-flex items-center justify-center whitespace-nowrap rounded-md text-sm font-medium ring-offset-background transition-colors focus-visible:outline-none focus-visible:ring-2 focus-visible:ring-ring focus-visible:ring-offset-2 disabled:pointer-events-none disabled:opacity-50 border border-input bg-background hover:bg-accent hover:text-accent-foreground h-10 px-4 py-2"
          onClick={downloadCsv}>
          CSV output
        </button>
      </div>
    </div>
  );
}
UT自動作成
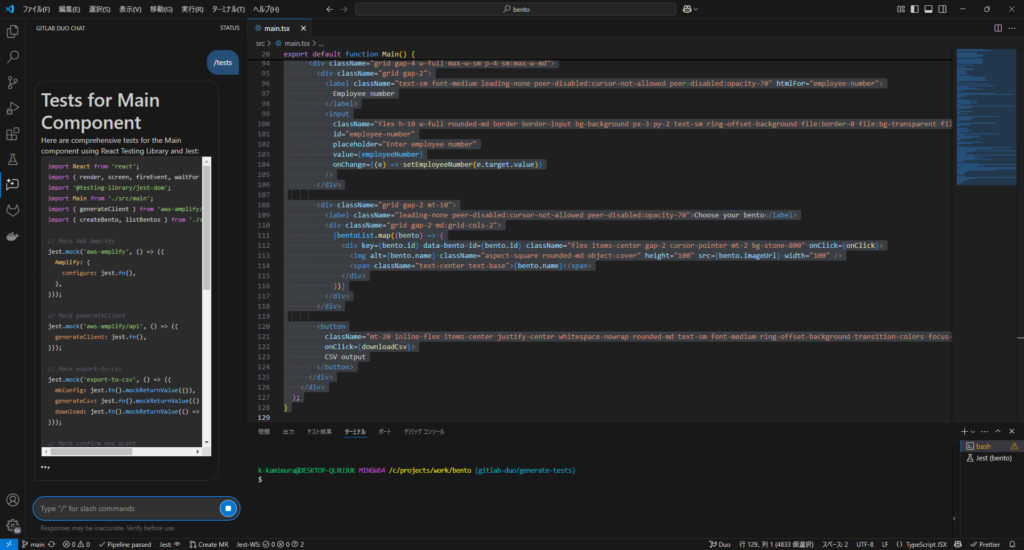
Visual Studio Codeで、main.tsxの全体を選択した状態でGitLab Duo Chat上に「/tests」と入力します。しばらく待つとUTが作成されます。結果が途中で切れてしまった場合は続きなどと入力して続きの作成を指示します。実行の度に内容が少し変わるので、何度か実行して、ぱっと見でよさそうな結果のものを採用しましょう。詳しい確認と調整は後ほど実施します。
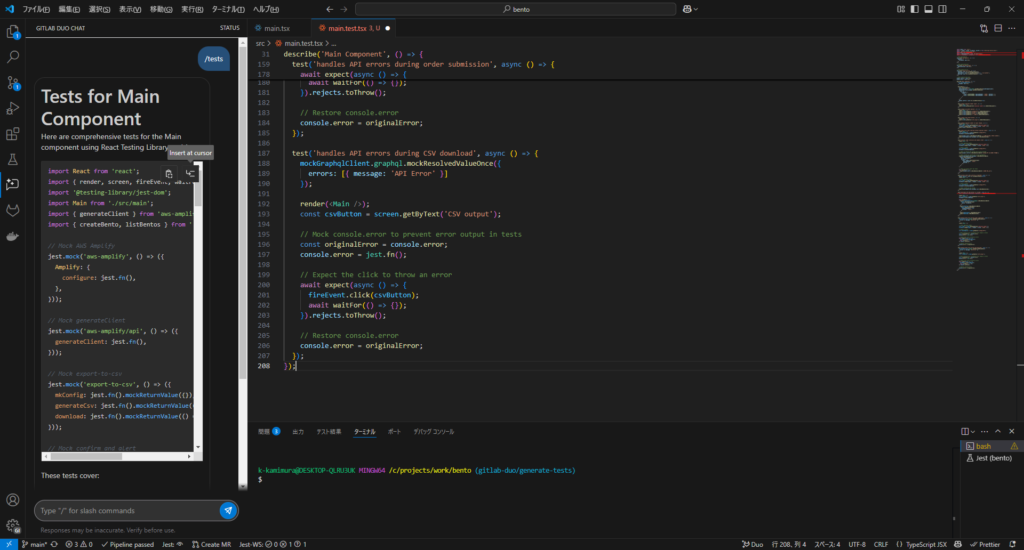
空のmain.test.tsxを作成し、Insert at cursorで作成された結果を取り込みます。続きなどとした場合は、切れ目の部分で重複などが発生している可能性があるため、必要に応じて調整します。
importを調整
import文のうち下記が間違っているので、修正します。
import { createBento, listBentos } from './graphql/queries';修正結果は下記の通りです。
import { listBentos } from './graphql/queries';
import { createBento } from './graphql/mutations';
状況の確認
これで、ひとまずテストを実行できるようになりました。
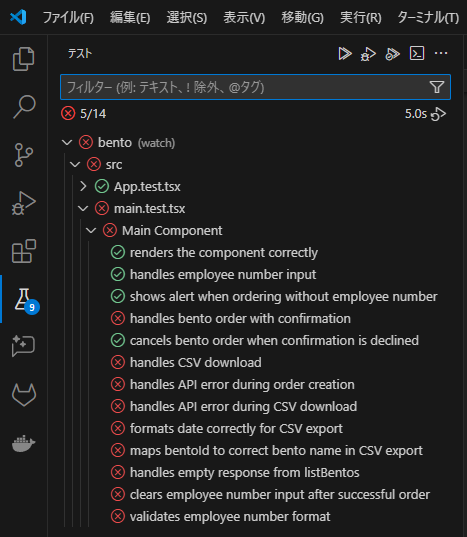
main.test.tsxには13個のテストケースが作成されていて、そのうち4個が成功しているようです。
この後は、失敗しているテストを修正する前に、全体の理解を進めましょう。そうしないと「そのテストがそもそも不要なものだった」などということが発生する可能性があります。
共通のモック処理
各testの処理前に実行される共通のモック処理を確認します。
aws-amplifyのモック化
// Mock AWS Amplify
jest.mock('aws-amplify', () => ({
  Amplify: {
    configure: jest.fn(),
  },
}));

// Mock generateClient
jest.mock('aws-amplify/api', () => ({
  generateClient: jest.fn(),
}));
Amplifyのモック化です。フロントのコンポーネントテストなので、API呼び出し部分をモック化するのは適切です。内容も問題なさそうに見えるので、いったんこのままにします。
CSV出力用のexport-to-csvパッケージのモック化
// Mock export-to-csv
jest.mock('export-to-csv', () => ({
  mkConfig: jest.fn().mockReturnValue({}),
  generateCsv: jest.fn().mockReturnValue(() => 'csv-content'),
  download: jest.fn().mockReturnValue(() => {}),
}));export-to-csvに含まれている機能がモック化されています。コンポーネントの実装は、CSVの生成は外部に対して隠蔽されており、ブラウザへのレスポンスだけが外部から観測可能です。UTでは生成された結果のCSVは確認が困難ですし、生成内容自体はパッケージの実装を信じることにするため、ここでは生成処理が適切に呼び出されたかどうかだけを確認すれば十分です。そのため、生成処理をモック化するのはよい方針だと言えます。モックの内容が適切・十分かはまだ判断できないので、いったんこのままにします。
画像のモック化
// Mock image imports
jest.mock('./image/28206674_s.jpg', () => 'hamburger-image-url');
jest.mock('./image/28796399_s.jpg', () => 'karaage-image-url');
jest.mock('./image/28927123_s.jpg', () => 'makunouchi-image-url');
jest.mock('./image/28939604_s.jpg', () => 'hirekatsu-image-url');コンポーネントではプロジェクトに含まれている静的な画像がimportされていますが、ここではそれらがモック化されています。画像自体はUTの対象ではなく、モック化することでUTの実行が高速化できるかもしれません。ただ、モック化が必須ではないものをモック化するとUTが複雑になったりテストの信頼性が下がったりする恐れがあります。そのリスクを受容してまで高速化する意味もないので、このモック化処理は削除しておきます。
その他のモック化
describe('Main Component', () => {
  const mockGraphqlClient = {
    graphql: jest.fn(),
  };

  beforeEach(() => {
    jest.clearAllMocks();
    (generateClient as jest.Mock).mockReturnValue(mockGraphqlClient);
    window.alert = jest.fn();
    window.confirm = jest.fn();
  });
AmplifyのGraphQLクライアントがモック化されています。特に問題なさそうです。
また、alertとconfirmがモック化されています。これらは実際に動作する必要はなく、呼び出し状況を確認したいので、モック化するのは適切です。
テスト内容の確認
renders the component correctly
  test('renders the component correctly', () => {
    render(<Main />);

    // Check if employee number input exists
    expect(screen.getByLabelText(/employee number/i)).toBeInTheDocument();

    // Check if all bento options are rendered
    expect(screen.getByText('ハンバーグ')).toBeInTheDocument();
    expect(screen.getByText('唐揚げ')).toBeInTheDocument();
    expect(screen.getByText('幕の内')).toBeInTheDocument();
    expect(screen.getByText('ヒレカツ')).toBeInTheDocument();

    // Check if CSV output button exists
    expect(screen.getByText('CSV output')).toBeInTheDocument();
});対象のコンポーネントをレンダリングした後に、各要素が存在していることを確認しています。大きな問題はありませんが、toBeInTheDocumentではなくtoBeVisibleの方がより堅いアサーションになります。
handles employee number input
  test('handles employee number input', async () => {
    render(<Main />);

    const input = screen.getByLabelText(/employee number/i);
    await userEvent.type(input, '12345');

    expect(input).toHaveValue('12345');
  });
入力欄への入力が機能しているかを確認しています。controlled componentの実装が不正だと意図通りに入力できないこともあるので、このテストも実施しておいた方が安全です。このままでよいでしょう。
shows alert when ordering without employee number
  test('shows alert when ordering without employee number', async () => {
    render(<Main />);

    // Click on a bento without entering employee number
    const bentoItem = screen.getByText('ハンバーグ').closest('div');
    fireEvent.click(bentoItem!);

    expect(window.alert).toHaveBeenCalledWith('社員番号が入力されていません。');
  });
社員番号が未入力の状態で弁当付近をクリックするとエラーメッセージが表示されることを確認しています。non-null assertionを使っているのが気持ち悪いですが、もしも対象要素が取得できなかった場合は結局アサーションに失敗してくれるので、このままでよいでしょう。テスト内容は概ね問題なさそうですが、より堅くするために「注文APIが呼び出されていないこと」も確認しておくことにします。
    expect(window.alert).toHaveBeenCalledWith('社員番号が入力されていません。');
    expect(mockGraphqlClient.graphql).not.toHaveBeenCalled();
handles bento order with confirmation
  test('handles bento order with confirmation', async () => {
    mockGraphqlClient.graphql.mockResolvedValueOnce({ data: { createBento: { id: 'new-id' } } });
    (window.confirm as jest.Mock).mockReturnValueOnce(true);

    render(<Main />);

    // Enter employee number
    const input = screen.getByLabelText(/employee number/i);
    await userEvent.type(input, '12345');

    // Click on a bento
    const bentoItem = screen.getByText('ハンバーグ').closest('div');
    fireEvent.click(bentoItem!);

    // Check if confirmation was shown
    expect(window.confirm).toHaveBeenCalledWith('ハンバーグ を注文しますか?');

    // Check if API was called with correct parameters
    await waitFor(() => {
      expect(mockGraphqlClient.graphql).toHaveBeenCalledWith({
        query: createBento,
        variables: {
          input: expect.objectContaining({
            employeeNumber: '12345',
            bentoId: 1,
          }),
        },
      });
    });

    // Check if success message was shown
    expect(window.alert).toHaveBeenCalledWith('注文しました。');
  });
このテストは失敗しています。失敗している部分を確認したくなりますが、全体のテスト内容が適切かを理解しないと意味がないので、上から順に確認していきましょう。
社員番号を入力後にハンバーグ弁当をクリックして、「ハンバーグ を注文しますか?」の確認が表示されてから注文APIが呼び出され、最後に「注文しました。」と表示されることが確認されていますね。正常な注文処理の確認です。内容は問題なさそうですが、最後のアサーションで「1度も呼び出されていない」という内容で失敗しています。fireEvent.clickによりclickイベントハンドラが実行されますが、イベントハンドラ内の非同期処理(graphqlメソッド)が完了する前に後続処理の結果を確認しようとしていることが原因です。waitForを使う手もありますが、userEventを使うと簡単なので、下記のように書き換えます。
    const user = userEvent.setup();
    render(<Main />);

    // Enter employee number
    const input = screen.getByLabelText(/employee number/i);
    await user.type(input, '12345');

    // Click on a bento
    const bentoItem = screen.getByText('ハンバーグ').closest('div');
await user.click(bentoItem!);これで、このテストは成功するようになりました。API呼び出し部分のwaitForも不要になるので、ラップを廃止して単純なexpectに変更しておきます。
他のテストのfireEventも全てuserEventに書き換えることにします。ここまでに見てきたテストも全て書き換えておきます。同様に、await userEvent.typeはawait user.typeに書き換えます。
cancels bento order when confirmation is declined
  test('cancels bento order when confirmation is declined', async () => {
    (window.confirm as jest.Mock).mockReturnValueOnce(false);

    render(<Main />);

    // Enter employee number
    const input = screen.getByLabelText(/employee number/i);
    await userEvent.type(input, '12345');

    // Click on a bento
    const bentoItem = screen.getByText('唐揚げ').closest('div');
    fireEvent.click(bentoItem!);

    // Check if confirmation was shown
    expect(window.confirm).toHaveBeenCalledWith('唐揚げ を注文しますか?');

    // Check that API was not called
    expect(mockGraphqlClient.graphql).not.toHaveBeenCalled();
});先ほどと同様の内容ですが、注文の確認時にキャンセルするテストです。キャンセル後に注文APIが呼び出されないことが確認されています。fireEventは全てuserEventに書き換えます。
handles CSV download
  test('handles CSV download', async () => {
    const mockBentoItems = [
      { date: 1625097600000, employeeNumber: '12345', bentoId: 1 },
      { date: 1625184000000, employeeNumber: '67890', bentoId: 2 },
    ];

    mockGraphqlClient.graphql.mockResolvedValueOnce({
      data: {
        listBentos: {
          items: mockBentoItems,
        },
      },
    });

    render(<Main />);

    // Click CSV output button
    const csvButton = screen.getByText('CSV output');
    fireEvent.click(csvButton);

    // Check if API was called
    await waitFor(() => {
      expect(mockGraphqlClient.graphql).toHaveBeenCalledWith({
        query: listBentos,
      });
    });

    // Check if CSV generation was called with correct data
    const { mkConfig, generateCsv, download } = require('export-to-csv');
    expect(mkConfig).toHaveBeenCalled();
    expect(generateCsv).toHaveBeenCalled();
    expect(download).toHaveBeenCalled();
});CSVダウンロードのテストです。CSVダウンロード対象のデータをAPIモックから取得しようとしていることと、CSVダウンロード用の機能が呼び出されていることが確認されています。モックの設定がおかしいため、テストがエラーになっています。generateCsvとdownloadは関数を返す関数なので、冒頭で確認してあったモックをそのように作り替えます。
// Mock export-to-csv
jest.mock('export-to-csv', () => {
  const generateCsvCore = jest.fn();
  const downloadCore = jest.fn();
  return {
    mkConfig: jest.fn().mockReturnValue({}),
    generateCsv: () => generateCsvCore,
    download: () => downloadCore,
  };
});テスト本体も、generateCsvやdownloadが返した関数が呼び出されていることを確認するように変更します。つまり、実際にCSVの生成やダウンロードを行うための関数が呼び出されていることを確認します。
    // Check if CSV generation was called with correct data
    const { mkConfig, generateCsv, download } = require('export-to-csv');
    expect(mkConfig).toHaveBeenCalled();
    expect(generateCsv()).toHaveBeenCalled();
expect(download()).toHaveBeenCalled();あとはfireEventをuserEventに変更します。これでこのテストは成功するようになりました。
handles API error during order creation
  test('handles API error during order creation', async () => {
    mockGraphqlClient.graphql.mockResolvedValueOnce({ errors: [{ message: 'API Error' }] });
    (window.confirm as jest.Mock).mockReturnValueOnce(true);

    render(<Main />);

    // Enter employee number
    const input = screen.getByLabelText(/employee number/i);
    await userEvent.type(input, '12345');

    // Click on a bento
    const bentoItem = screen.getByText('ハンバーグ').closest('div');

    // Expect error to be thrown
    await expect(async () => {
      fireEvent.click(bentoItem!);
      await waitFor(() => {
        expect(mockGraphqlClient.graphql).toHaveBeenCalled();
      });
    }).rejects.toThrow();
});注文APIがエラーを返してきた場合のテストです。このテストはthrow new Errorされているという内容でエラーが発生しています。rejects.toThrow()という記述はありますが、これでは意図通り機能していません。userEventを使って以下のように書き換えると成功するようになります。
    // Expect error to be thrown
    expect(() => {
      user.click(csvButton);

      expect(mockGraphqlClient.graphql).toHaveBeenCalled();
    }).toThrow();
API呼び出しの後で成功の表示をしていないことも確認するようにしましょう。
    expect(() => {
      user.click(bentoItem!);

      expect(mockGraphqlClient.graphql).toHaveBeenCalled();
      expect(window.alert).not.toHaveBeenCalledWith('注文しました。');
    }).toThrow();
handles API error during CSV download
  test('handles API error during CSV download', async () => {
    mockGraphqlClient.graphql.mockResolvedValueOnce({ errors: [{ message: 'API Error' }] });

    render(<Main />);

    // Click CSV output button
    const csvButton = screen.getByText('CSV output');

    // Expect error to be thrown
    await expect(async () => {
      fireEvent.click(csvButton);
      await waitFor(() => {
        expect(mockGraphqlClient.graphql).toHaveBeenCalled();
      });
    }).rejects.toThrow();
});CSVダウンロード時に、対象データ取得用のAPIがエラーを返した場合のテストです。先ほどと同様に、userEventを使ってrejects.toThrow()をtoThrow()に変更します。ダウンロード処理が呼び出されていないことの確認を追加してもよいですが、ここでは省略します。
formats date correctly for CSV export
  test('formats date correctly for CSV export', async () => {
    const mockBentoItems = [{ date: 1625097600000, employeeNumber: '12345', bentoId: 1 }];

    mockGraphqlClient.graphql.mockResolvedValueOnce({
      data: {
        listBentos: {
          items: mockBentoItems,
        },
      },
    });

    render(<Main />);

    // Click CSV output button
    const csvButton = screen.getByText('CSV output');
    fireEvent.click(csvButton);

    // Check if API was called
    await waitFor(() => {
      expect(mockGraphqlClient.graphql).toHaveBeenCalledWith({
        query: listBentos,
      });
    });

    // Check if date was formatted correctly
    const { generateCsv } = require('export-to-csv');
    expect(generateCsv).toHaveBeenCalledWith(
      expect.arrayContaining([
        expect.objectContaining({
          date: expect.any(String), // Should be formatted as string
          employeeNumber: '12345',
          bentoName: 'ハンバーグ', // Should map bentoId to name
        }),
      ]),
    );
  });
CSV出力内容の確認です。ここまでに見てきたものと同様の問題は同じように直しておきます。また、アサーション部分の記述が不正でテストが失敗しているので、書き換えます。その際、モックデータもわかりやすい内容に変更しておきます。
    const mockBentoItems = [
      {
        date: new Date(new Date(2024, 11, 31, 23, 59, 58, 123).getTime() - new Date().getTimezoneOffset() * 60 * 1000),
        employeeNumber: '12345',
        bentoId: 1,
      },
    ];
expect(generateCsv()).toHaveBeenCalledWith([
{
date: '2024-12-31T23:59:58.123Z',
employeeNumber: '12345',
bentoId: 1,
},
]);maps bentoId to correct bento name in CSV export
  test('maps bentoId to correct bento name in CSV export', async () => {
    const mockBentoItems = [
      { date: 1625097600000, employeeNumber: '12345', bentoId: 1 },
      { date: 1625097600000, employeeNumber: '12345', bentoId: 2 },
      { date: 1625097600000, employeeNumber: '12345', bentoId: 3 },
      { date: 1625097600000, employeeNumber: '12345', bentoId: 4 },
    ];

    mockGraphqlClient.graphql.mockResolvedValueOnce({
      data: {
        listBentos: {
          items: mockBentoItems,
        },
      },
    });

    render(<Main />);

    // Click CSV output button
    const csvButton = screen.getByText('CSV output');
    fireEvent.click(csvButton);

    // Check if API was called
    await waitFor(() => {
      expect(mockGraphqlClient.graphql).toHaveBeenCalledWith({
        query: listBentos,
      });
    });

    // Check if bentoIds were mapped to correct names
    const { generateCsv } = require('export-to-csv');
    const expectedData = [
      { date: expect.any(String), employeeNumber: '12345', bentoName: 'ハンバーグ' },
      { date: expect.any(String), employeeNumber: '12345', bentoName: '唐揚げ' },
      { date: expect.any(String), employeeNumber: '12345', bentoName: '幕の内' },
      { date: expect.any(String), employeeNumber: '12345', bentoName: 'ヒレカツ' },
    ];

    expect(generateCsv).toHaveBeenCalledWith(expect.arrayContaining(expectedData));
  });
CSV出力時に弁当IDが弁当名に変換されて出力されることのテストです。ただ、先ほどのテストでも見たとおり、そもそもCSV出力は「弁当IDのまま出力する」という仕様です。従ってこのテストは不要なため、削除します。
handles empty response from listBentos
  test('handles empty response from listBentos', async () => {
    mockGraphqlClient.graphql.mockResolvedValueOnce({
      data: {
        listBentos: {
          items: [],
        },
      },
    });

    render(<Main />);

    // Click CSV output button
    const csvButton = screen.getByText('CSV output');
    fireEvent.click(csvButton);

    // Check if API was called
    await waitFor(() => {
      expect(mockGraphqlClient.graphql).toHaveBeenCalledWith({
        query: listBentos,
      });
    });

    // Check if CSV generation was called with empty array
    const { generateCsv } = require('export-to-csv');
    expect(generateCsv).toHaveBeenCalledWith([]);
});CSV出力で対象データが0件の場合のテストです。ここまで見てきた内容を踏まえてfireEventとgenerateCsvを調整するだけでよさそうです。
clears employee number input after successful order
  test('clears employee number input after successful order', async () => {
    mockGraphqlClient.graphql.mockResolvedValueOnce({ data: { createBento: { id: 'new-id' } } });
    (window.confirm as jest.Mock).mockReturnValueOnce(true);

    render(<Main />);

    // Enter employee number
    const input = screen.getByLabelText(/employee number/i);
    await userEvent.type(input, '12345');

    // Click on a bento
    const bentoItem = screen.getByText('ハンバーグ').closest('div');
    fireEvent.click(bentoItem!);

    // Check if input was cleared after successful order
    await waitFor(() => {
      expect(input).toHaveValue('');
    });
  });
注文成功後に社員番号の入力欄を空にできているかのテストです。ただ、そのような仕様(実装)はないためテストが失敗しています。このテストは不要なため、削除します。
validates employee number format
  test('validates employee number format', async () => {
    render(<Main />);

    // Enter invalid employee number (non-numeric)
    const input = screen.getByLabelText(/employee number/i);
    await userEvent.type(input, 'abc123');

    // Click on a bento
    const bentoItem = screen.getByText('ハンバーグ').closest('div');
    fireEvent.click(bentoItem!);

    // Check if validation alert was shown
    expect(window.alert).toHaveBeenCalledWith('社員番号は数字のみ入力してください。');
  });
社員番号のバリデーションのテストです。バリデーションは実装されていないため、このテストは失敗します。このテストは不要なため、削除します。
テストの過不足
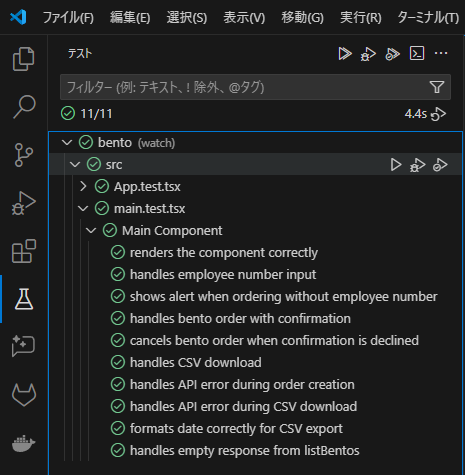
各テストでのアサーションの強化などは、ここまでに見てきた通りです。全体のテストケースとしては、不要なものが若干ありましたが、不足はなさそうです。最終的に10個のケースが完成しました。
まとめ
GitLab Duoを使ったテスト自動作成全体の振り返りです。
- 基本的な文法ミスは存在しなかった。
import元のミスが1件だけあった。- 自前で実装すると手間がかかるモック周りも、ほぼ問題なく作成された。
- 関数を返す関数のモックなど、複雑なものは不正な結果になった。
- モック化する必要のない画像がモック化された。
- テストケースは、若干ハルシネーションがあるものの、不足なく作成された。
- エラー処理やデータが0件の場合のエッジケースなども作成された。
- 非同期処理に関する考慮がしきれておらず、失敗するテストが複数あった。
- アサーションはほぼ問題ないが、強化の余地が若干あった。
既存コードに対するテストの作成時に活用すると、検討・実装の時間を大幅に短縮でき、エッジケースなども見逃しにくくなるため、非常に役立つことがわかりました。
アンチパターン
GitLab Duoのテスト自動作成機能は、うまく使えば強い味方になります。一方で、以下のような使い方は避けた方がよいでしょう。
- 作成されたテストを、その内容を精査せずに、(成功している分だけでも)そのまま採用する。
テストは本来「何かを確認・担保」するためのものです。何を担保している(できている)かが分からなければ、担保したいものを担保できているかも分からず、テストの意味がないことになります。そのようなテストは無駄であるだけでなく、内容がおかしいと読んだ人に混乱を生じさせる原因にもなります。
おまけ:GitHub Copilotとの比較
GitHub CopilotにもGitLab Duoと同様の「/tests」機能があります。今回チャレンジした弁当注文アプリのコンポーネントに対してGitHub Copilotでも自動テストを作成してみました。作成結果のテストコードの記載は省略しますが、数回実行してみたところGitLab Duoとほぼ同じような内容・精度で作成されました。今のところ、どちらが優れているとか状況に応じてどのように使い分けるかということは判断が難しそうです。開発で利用している環境やリポジトリなどを踏まえて総合的に判断するのが良さそうです。
Author
教育系エンジニア。開発やR&Dで最前線の技術を実践しつつ、後進の育成にも魂を燃やす。排出者は数千名。無類の子ども好きで、平日夕方は仕事を中抜けして近所の子どもと遊ぶ毎日。小学校でのプログラミング授業なども経験あり。


