
SoftLayerに構築したNFSサーバをオフィスからIPsec VPN接続して利用する #softlayer
この記事は1年以上前に投稿されました。情報が古い可能性がありますので、ご注意ください。
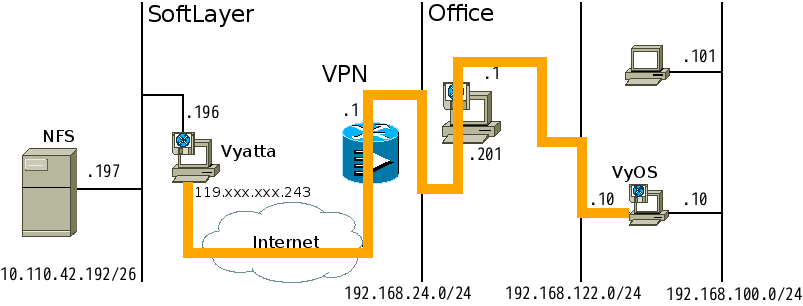
前回の記事では、ソフトウェアルータの Vyatta と VyOS を用いて、SoftLayer とオフィスを IPsec VPN で接続しました。
ここでは SoftLayer 側に NFS サーバを構築し、IPsec VPN を通してオフィスのクライアントから利用するというシナリオを考えてみます。
前提とする検証環境
前回の記事にて構築した IPsec VPN 環境を用います。

オフィス側
クライアントPC (Ubuntu 12.04 LTS)
: プライベート側: 192.168.100.101 (eth1 のみ)
VyOS (1.0.4)
: 仮想ネットワーク側: 192.168.122.10
プライベート側: 192.168.100.10
SoftLayer 側
Vyatta (6.6 Community Edition)
: グローバル側: 119.XXX.XXX.243 (eth1)
プライベート側: 10.110.42.196 (eth0)
サーバPC (CentOS 6 Minimal Install)
: プライベート側: 10.110.42.197 (eth0 のみ)
SoftLayer 側サーバ PC に NFS サーバのインストール
では、SoftLayer 側サーバ PC に必要なソフトウェアをインストールしましょう。
SoftLayer 側サーバ PC はプライベート側ネットワークにしか接続されていないため、インターネット上のファイルを直接取得することはできません。SoftLayer では各種 OS やソフトウェアのアーカイブをミラーリングしており、プライベート側ネットワークからも参照することができます。
Index of /

Icon  Name                     Last modified      Size
------------------------------------------------------------------------------
[DIR] boundary/                04-Apr-2013 12:51    -
[DIR] centos/                  07-Jul-2014 04:50    -
[DIR] debian-archive/          25-Mar-2012 03:40    -
[DIR] debian-backports/        14-Jul-2014 04:20    -
[DIR] debian-cd/               13-Jul-2014 12:55    -
[DIR] debian-security-archive/ 24-Mar-2012 17:23    -
[DIR] debian-security/         13-Jul-2014 07:22    -
[DIR] debian-volatile/         11-Apr-2012 11:30    -
[DIR] debian/                  14-Jul-2014 04:56    -
[DIR] dell/                    03-Jun-2011 15:21    -
[DIR] fedora-archive/          26-Oct-2010 14:59    -
[DIR] fedora/                  21-May-2007 16:37    -
[DIR] freebsd/                 13-Jul-2014 05:01    -
[DIR] ksplice/                 05-Jun-2011 20:36    -
[DIR] mongodb/                 13-Jul-2012 13:31    -
[DIR] novell/                  21-Apr-2009 12:12    -
[DIR] osnexus/                 08-May-2012 20:30    -
[DIR] r1soft/                  12-Apr-2012 12:01    -
[DIR] rubygems/                22-Jun-2011 13:53    -
[DIR] ubuntu-releases/         14-Jul-2014 11:23    -
[DIR] ubuntu/                  14-Jul-2014 09:13    -
------------------------------------------------------------------------------
SoftLayer 側 PC である CentOS も、デフォルトでこのミラーを参照するよう yum が設定されています。
[root@protected ~]# diff -u /etc/yum.repos.d/CentOS-Base.repo.orig /etc/yum.repos.d/CentOS-Base.repo
--- /etc/yum.repos.d/CentOS-Base.repo.orig	2014-07-07 20:35:41.000000000 -0500
+++ /etc/yum.repos.d/CentOS-Base.repo	2014-07-07 20:35:41.000000000 -0500
@@ -1,52 +1,41 @@
-# CentOS-Base.repo
-#
-# The mirror system uses the connecting IP address of the client and the
-# update status of each mirror to pick mirrors that are updated to and
-# geographically close to the client.  You should use this for CentOS updates
-# unless you are manually picking other mirrors.
-#
-# If the mirrorlist= does not work for you, as a fall back you can try the
-# remarked out baseurl= line instead.
-#
-#
-
[base]
name=CentOS-$releasever - Base
+baseurl=http://mirrors.service.networklayer.com/centos/$releasever/os/$basearch/
mirrorlist=http://mirrorlist.centos.org/?release=$releasever&arch=$basearch&repo=os
-#baseurl=http://mirror.centos.org/centos/$releasever/os/$basearch/
gpgcheck=1
-gpgkey=file:///etc/pki/rpm-gpg/RPM-GPG-KEY-CentOS-6
+gpgkey=http://mirrors.service.networklayer.com/centos/RPM-GPG-KEY-CentOS-6

-#released updates
+#released updates
[updates]
name=CentOS-$releasever - Updates
+baseurl=http://mirrors.service.networklayer.com/centos/$releasever/updates/$basearch/
mirrorlist=http://mirrorlist.centos.org/?release=$releasever&arch=$basearch&repo=updates
-#baseurl=http://mirror.centos.org/centos/$releasever/updates/$basearch/
gpgcheck=1
-gpgkey=file:///etc/pki/rpm-gpg/RPM-GPG-KEY-CentOS-6
+gpgkey=http://mirrors.service.networklayer.com/centos/RPM-GPG-KEY-CentOS-6

#additional packages that may be useful
[extras]
name=CentOS-$releasever - Extras
+baseurl=http://mirrors.service.networklayer.com/centos/$releasever/extras/$basearch/
mirrorlist=http://mirrorlist.centos.org/?release=$releasever&arch=$basearch&repo=extras
-#baseurl=http://mirror.centos.org/centos/$releasever/extras/$basearch/
gpgcheck=1
-gpgkey=file:///etc/pki/rpm-gpg/RPM-GPG-KEY-CentOS-6
+gpgkey=http://mirrors.service.networklayer.com/centos/RPM-GPG-KEY-CentOS-6

#additional packages that extend functionality of existing packages
[centosplus]
name=CentOS-$releasever - Plus
+baseurl=http://mirrors.service.networklayer.com/centos/$releasever/centosplus/$basearch/
mirrorlist=http://mirrorlist.centos.org/?release=$releasever&arch=$basearch&repo=centosplus
-#baseurl=http://mirror.centos.org/centos/$releasever/centosplus/$basearch/
gpgcheck=1
enabled=0
-gpgkey=file:///etc/pki/rpm-gpg/RPM-GPG-KEY-CentOS-6
+gpgkey=http://mirrors.service.networklayer.com/centos/RPM-GPG-KEY-CentOS-6

 #contrib - packages by Centos Users
[contrib]
name=CentOS-$releasever - Contrib
+baseurl=http://mirrors.service.networklayer.com/centos/$releasever/contrib/$basearch/
mirrorlist=http://mirrorlist.centos.org/?release=$releasever&arch=$basearch&repo=contrib
-#baseurl=http://mirror.centos.org/centos/$releasever/contrib/$basearch/
gpgcheck=1
enabled=0
-gpgkey=file:///etc/pki/rpm-gpg/RPM-GPG-KEY-CentOS-6
+gpgkey=http://mirrors.service.networklayer.com/centos/RPM-GPG-KEY-CentOS-6
+
[root@protected ~]#
[root@protected ~]# host mirrors.service.networklayer.com
mirrors.service.networklayer.com has address 10.0.77.54
[root@protected ~]#
NFS サーバのインストールと設定
では、yum コマンドを用いて NFS サーバである nfs-utils パッケージをインストールしましょう。
[root@protected ~]# yum install nfs-utils
Loaded plugins: fastestmirror, security
Loading mirror speeds from cached hostfile
* base: mirrors.service.networklayer.com
* extras: mirrors.service.networklayer.com
* updates: mirrors.service.networklayer.com
Setting up Install Process
Resolving Dependencies
:
================================================================================
Package             Arch         Version                   Repository     Size
================================================================================
Installing:
nfs-utils           x86_64       1:1.2.3-39.el6_5.3        updates       321 k
Installing for dependencies:
keyutils            x86_64       1.4-4.el6                 base           39 k
libevent            x86_64       1.4.13-4.el6              base           66 k
libgssglue          x86_64       0.1-11.el6                base           23 k
libtirpc            x86_64       0.2.1-6.el6_5.2           updates        79 k
nfs-utils-lib       x86_64       1.1.5-6.el6               base           67 k
rpcbind             x86_64       0.2.0-11.el6              base           51 k

Transaction Summary
================================================================================
Install 7 Package(s)

Total download size: 646 k
Installed size: 1.7 M
Is this ok [y/N]: y
:
Installed:
nfs-utils.x86_64 1:1.2.3-39.el6_5.3

Dependency Installed:
keyutils.x86_64 0:1.4-4.el6 libevent.x86_64 0:1.4.13-4.el6
libgssglue.x86_64 0:0.1-11.el6 libtirpc.x86_64 0:0.2.1-6.el6_5.2
nfs-utils-lib.x86_64 0:1.1.5-6.el6 rpcbind.x86_64 0:0.2.0-11.el6

Complete!
[root@protected ~]#
共有ディレクトリを作成します。目印になるファイルを置いておきます。
[root@protected ~]# mkdir /home/nfs
[root@protected ~]# chown nobody.nobody /home/nfs
[root@protected ~]# touch /home/nfs/NFS_SHARED
[root@protected ~]#
共有設定を行います。NFS の詳細な設定内容については専門書等を参照してください。
[root@protected ~]# vi /etc/exports
/home/nfs 10.0.0.0/255.0.0.0(rw,sync,no_root_squash)
[root@protected ~]#
NFS サーバと関連サーバを起動します。
[root@protected ~]# service rpcbind start
Starting rpcbind:                                          [  OK  ]
[root@protected ~]# service nfslock start
Starting NFS statd:                                        [  OK  ]
[root@protected ~]# service nfs start
Starting NFS services:                                     [  OK  ]
Starting NFS quotas:                                       [  OK  ]
Starting NFS mountd:                                       [  OK  ]
Starting NFS daemon:                                       [  OK  ]
Starting RPC idmapd:                                       [  OK  ]
[root@protected ~]#
NFS サーバと関連サーバの自動起動を設定します。
[root@protected ~]# chkconfig --list smb
smb            	0:off	1:off	2:off	3:off	4:off	5:off	6:off
[root@protected ~]# chkconfig --list smb
smb            	0:off	1:off	2:on	3:on	4:on	5:on	6:off
[root@protected ~]# chkconfig --list rpcbind
rpcbind 0:off 1:off 2:on 3:on 4:on 5:on 6:off
[root@protected ~]# chkconfig --list nfslock
nfslock 0:off 1:off 2:off 3:on 4:on 5:on 6:off
[root@protected ~]# chkconfig --list nfs
nfs 0:off 1:off 2:off 3:off 4:off 5:off 6:off
[root@protected ~]#

[root@protected ~]# chkconfig nfs on
[root@protected ~]# chkconfig --list nfs
nfs            	0:off	1:off	2:on	3:on	4:on	5:on	6:off
[root@protected ~]#
NFS クライアントのインストール
オフィス側クライアント PC で NFS マウントを行うために関連サービスをインストールします。
ubuntu@ubuntu:~$ sudo apt-get install nfs-common -y
Reading package lists... Done
Building dependency tree
Reading state information... Done
The following extra packages will be installed:
libgssglue1 libnfsidmap2 libtirpc1 rpcbind
The following NEW packages will be installed:
libgssglue1 libnfsidmap2 libtirpc1 nfs-common rpcbind
:
ubuntu@ubuntu:~$
NFS 共有ディレクトリをマウントする
では、オフィス側クライアント PC で NFS サーバの共有ディレクトリをマウントしてみましょう。
ubuntu@ubuntu:~$ sudo mount -t nfs 10.110.42.197:/home/nfs /mnt
ubuntu@ubuntu:~$ ls -l /mnt/
total 0
-rw-r--r-- 1 nobody nogroup 0 Jul 16 17:36 NFS_SHARED
ubuntu@ubuntu:~$
マウントできました。クライアント側からもファイルを書き込んでみます。
ubuntu@ubuntu:~$ sudo cp /etc/lsb-release /mnt
ubuntu@ubuntu:~$ ls -l /mnt
total 4
-rw-r--r-- 1 nobody nogroup   0 Jul 16 17:36 NFS_SHARED
-rw-r--r-- 1 nobody nogroup 106 Jul 16  2014 lsb-release
ubuntu@ubuntu:~$
書き込めました。サーバ側でも確認してみます。
[root@protected ~]# ls -l /home/nfs
total 4
-rw-r--r-- 1 root root   0 Jul 16 03:36 NFS_SHARED
-rw-r--r-- 1 root root 106 Jul 16 03:50 lsb-release
[root@protected ~]#
まとめ
SoftLayer のプライベートネットワーク上に構築した NFS サーバを、IPsec VPN を経由してオフィスのプライベートネットワーク上のクライアント PC から利用してみました。
ここではサーバ PC の OS に CentOS 6 を用いて NFS サーバを構築しましたが、Samba サーバを用いたり、サーバ PC の OS に Windows Server を用いて Windows ファイルサーバ(共有フォルダ)を構築することも可能と思われます。
IPsec VPN と合わせて是非試してみてください。
Author
はやりの技術要素に加えて、会議の進め方・文章の書き方などの業務改善にも取り組んでいます。「Chef活用ガイド」共著のほか、Debian Official Developerもやっています。


